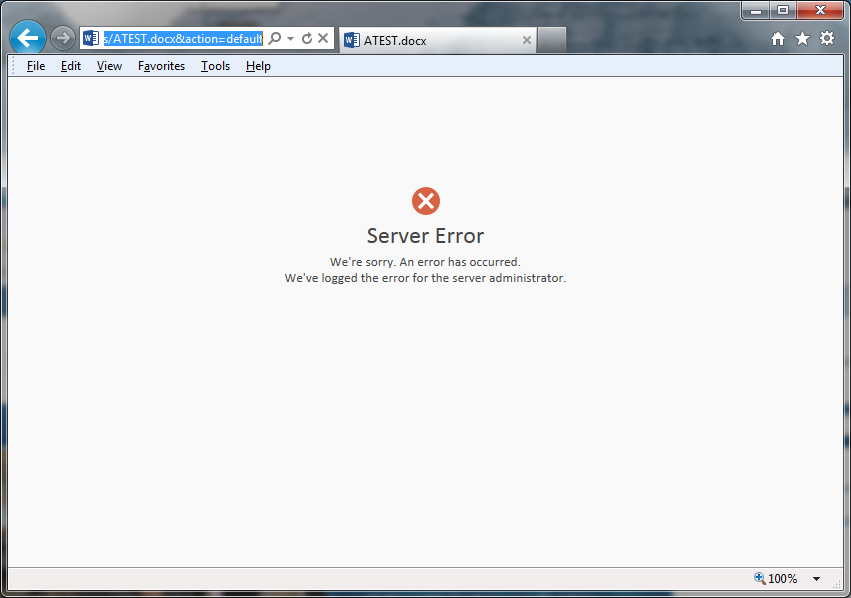
Quantcast
Channel: Al's Tech Tips
Viewing all 388 articles
Browse latest View live

SharePoint 2013: Move a list template from one site collection to another

$
0
0
Tip

When you save a list or library as a template, that template is saved to the site collection's Template Gallery.  This template will then be available to any site in the site collection.  However, it will not be available to sites in other site collections.  To make it available to other site collections, you will need to copy if over.  This tip shows you how.

Steps
  1. Navigate to the list or library that you want to save as a template.
  2. Click LIST, to display the LIST ribbon, and then click List Settings.
  3. In the Permissions and Management group, click Save list as template.
  4. Once done, go to Site Settings, and then click Go to top level site settings, if you aren't yet.
  5. In the Web Designer Galleries group, click List templates.
  6. Select the template you want to copy.
  7. Click FILES above, to display the FILES ribbon, and then click Download a Copy.
  8. Save the copy to any convenient location.
  9. Navigate to the site where you want to create the new list or library based upon this template.
  10. Go to Site Settings, and then click Go to top level site settings, if you aren't yet.
  11. In the Web Designer Galleries group, click List templates.
  12. Click FILES, to display the FILES ribbon, and then click Upload Document.
  13. Upload the template file you created previously.
  14. Now your new template is available in the other site collection.
References

SharePoint 2013: Popularity and Search Reports option missing

$
0
0
Problem

You navigate to the top level Site Settings for a site collection and do not see the Popularity and Search Reports in the Site Collection Administration group.  This is likely due to not yet activating the Reporting feature for the site collection.

Solution
  1. Navigate to the top level site collection's Site Settings page.
  2. In the Site Collection Administration group, click Site Collection Features.
  3. On the Site Collection Features page, scroll down until you see the Reporting feature, and then click the Activate button.  The page will refresh to show the new status of the feature.
  4. Navigate back to the top level site collection's Site Settings page.
  5. In the Site Collection Administration group, click the Popularity and Search Reports link.  You will also find a new link in the Site Administration group, Popularity Trends
  6. A new report now appears in the Usage Reports group: Usage.
  7. You'll also see a new option appear in the FILES ribbon's Share & Track group:
  8. But look: the Site Collection Web Analyticsreports and Site Web Analyticsreports links are no longer displayed in the Site Actions group after activing the Reporting feature for the site collection:
  9. The actual pages, though, are still there: only the links to them have been removed from Site Settings.  To see these reports, just append the following to your site or site collection path: _layouts/15/usageDetails.aspx. Note though that there isn't much to these reports anymore.  SharePoint 2013 does not provide as much usage data nor organize it as well as SharePoint 2010 did.  There are some tools available to help you build usage reports via web server logs: The SharePoint Flavored Weblog Reader(SFWR) v1.4.
References

SharePoint 2013: How to move Central Administration to a new farm server

$
0
0
Introduction

The following simple procedure enables you to move a SharePoint farm's Central Administration web application to another farm server, while also updating the URL shortcut.  There is no need to modify registry entries to accomplish this.  The SharePoint Products Configuration Wizard does everything for you.

Solution
  1. Repeat the following steps on each farm server hosting the Central Administration web application:
    1. As the farm setup user administrator account (eg, spAdmin), remote into the farm server currently hosting the Central Administration web application.
    2. Run the SharePoint Products Configuration Wizard as administrator.
    3. At the Modify server farm Settings page of the wizard, verify that the option Do not disconnect from this server farm is selected, and then click Next.
    4. At the Modify SharePoint Central Administration Web Application Settings page of the wizard, select the option Yes, I want to remove this web site from this machine, and then click Next.
    5. Click Next again.
    6. Once the wizard has finished the configuration, exit the wizard.
    7. Log out of the machine.  At this point, your farm does not have a Central Administration web application.  That's OK.  Don't fret.  You'll be re-installing it momentarily.
  2. Repeat the following steps on each farm server on which you want to host the Central Administration web application:
    1. As the farm setup user administrator account (eg, spAdmin), remote into a farm server on which you want to host the Central Administration web application.
    2. Run the SharePoint Products Configuration Wizard as administrator.
    3. At the Modify server farm Settings page of the wizard, verify that the option Do not disconnect from this server farm is selected, and then click Next.
  • If this is the first time that you are running the wizard to install CA, you will be presented with the Configure SharePoint Central Administration Web Application page, where you can specify a port and authentication provider for the CA web application.  Enter this information, and then click Next.
  • If you are installing CA to yet another farm server (ie, to have two or more instances of CA available), you will be presented with the Completing the SharePoint Productions Configuration Wizard page, but having the Advanced Settings button enabled:
  1. Click the Advanced Settings button.  The Advanced Settings page is displayed.
  2. Select the option, Use this machine to host the web site, and then click OK.  This will not remove the other instance of CA already installed.  It only installs another instance.
  • Click Next again.
  • Once the wizard has finished the configuration, exit the wizard.
  • References
    Notes
    • It is imperative that you engage in this procedure while logged in as the farm setup user administrator account.  Only this account (if you installed your farm as this account) has the appropriate permissions necessary to access required folders and registry keys to make the necessary changes.
    • Thanks to Kenneth Marsner and his response to a Central Administation URL change posted in TechNet for describing how to do this.
    • There is absolutely no need to edit the registry in order to move the CA web application and have URLs updated, such as discussed here and here.  While this registry entry is effectively how individual instances of SharePoint Server actually track the URL for CA, editing this key will not update the farm's configuration database and will cause the farm configuration database to be out-of-sync with farm servers with respect to this parameter.  You can see this more clearly by examining the actual syntax of the Central Administration URL: the URL points to psconfigui with a command specified.
    • I was not able to find any specific Microsoft documentation that describes how to do this.  If any reviewer of this posting happens to know, please leave note and URL.
    • After running the SharePoint Products Configuration Wizard, you may see the Missing server side dependencies issue appear again in the farm's Health Report.  I have experienced this every time I run the configuration wizard or psconfig.

    SharePoint 2013: Session OfficeSearchHealthSession failed to start with the following error: 0xC0000035

    $
    0
    0
    Problem

    The following error appears in a SharePoint 2013 farm server's Application log:
    Log Name:      Microsoft-Windows-Kernel-EventTracing/Admin
    Source: Microsoft-Windows-Kernel-EventTracing
    Date: [Date/Time]
    Event ID: 2
    Task Category: Session
    Level: Error
    Keywords: Session
    User: [farm service account]
    Computer: [a farm server]
    Description:
    Session "OfficeSearchHealthSession" failed to start with the following
    error: 0xC0000035
    Event Xml:
    ...
    Solution
    • Ignore this error.
    • You can generate it manually by executing the following PowerShell script on the server:
      Start-Job -ScriptBlock {Restart-Service sptracev4}
      $job = Get-SPTimerJob -Identity "Search Health Monitoring - Trace Events"
      $job.Execute([System.Guid]::Empty)
      Refresh the Application log.
    References
    Notes
    • Thanks to Janis Norvelis for presenting the script.  Janis originally presented this script with respect to seeing this error appearing in SharePoint Server 2010 application logs.
    • I have seen this error appear in the Application log of all farm servers hosting SharePoint Server 2013, every 24 hours, separated by approximately one minute intervals among the farm servers.  It occurs on all my farms, both 2010 and 2013.  One example:
      • WFE1: 6:12:03 AM
      • APP1:  6:13:02 AM
      • WFE2: 6:14:03 AM

    SharePoint 2013: Errors were found when compiling the workflow.

    $
    0
    0
    Problem

    You installed Workflow Manager 1.0 on a SharePoint 2013 farm batch (application) server, and then you installed the Workflow Manager client on all the other farm servers hosting SharePoint Server 2013.  Users then inform you that the SharePoint 2013 Workflow option is available when creating new workflows.  However, whereas, before you installed Workflow Manager 1.0, users could still create 2010 workflows, now, after you installed the client, they experience an error when attempting to publish 2010 workflows:

    Solution
    • Reboot the servers on which you installed the Workflow Manager client.  All of them.
    References

    SharePoint 2010: Databases running in compatibility range, upgrade recommended

    $
    0
    0
    Problem

    You find the following entry in the SharePoint 2010 Central Administration Review problems and solutions All Reports listing:

    TitleDatabases running in compatibility range, upgrade recommended
    Severity2 - Warning
    CategoryConfiguration
    ExplanationThe following databases have versions that are older than the current SharePoint software, but are within the backwards compatible range: ...
    RemedyTo achieve optimal results from these databases, use Upgrade-SPContentDatabase to upgrade Content databases, or psconfig.exe to upgrade other databases.  For more information about this rule, see "http://go.microsoft.com/fwlink/?LinkID=142697".
    Failing Servers 
    Failing ServicesSPTimerService (SPTimerV4)
    Rule SettingsView
     
    Solution
    1. In an elevated SharePoint 2010 management shell, execute the PowerShell command presented in the message.
    References
    Notes
    • If this fails, verify that the SharePoint 2010 Timer service has been started.
     

    SharePoint 2010: An exception of type Microsoft.SharePoint.Administration.SPUpdatedConcurrencyException was thrown

    $
    0
    0
    Problem

    You restored a content database to your 2010 farm, and then attempted to run psconfig to configure the database.  The attempt fails with the following error:
    An exception of type Microsoft.SharePoint.Administration.SPUpdatedConcurrencyException was thrown.  Additional exception information: An update conflict has occurred, and you must re-try this action.  The object...

    You check the trace log and see the same message.

    Solution
    • First, verify that the SharePoint 2010 Timer service is started.  If it's stopped, this is likely the issue.  If it's not, try the next series of steps.
    • Perform the following steps:
    1. Open an elevated command prompt, and then execute stsadm -o setproperty -pn command-line-upgrade-running -pv No, followed by an iisreset
    2. Next, restart the SharePoint 2010 Timer service.
    References
    Notes
    • Upgrades will not succeed if the timer service is stopped.

    SharePoint 2013: Access is denied. (Exception from HRESULT: 0x80070005 (E_ACCESSDENIED))

    $
    0
    0
    Problem

    You attempt to run a PowerShell script against the SharePoint 2013 farm My Site web application and experience the following error message appearing for each website the script iterates through:
    Get-SPWeb : Access is denied. (Exception from HRESULT: 0x80070005 (E_ACCESSDENIED))
    At line:1 char:79
    + Get-SPWebApplication http:/[YourWebAppURL] | Get-SPSite -Limit All | Ge ...
    +                                                                               ~~
        + CategoryInfo          : InvalidData: (Microsoft.Share....SPCmdletGetWeb:SPCmdletGetWeb) [Get
       -SPWeb], UnauthorizedAccessException
        + FullyQualifiedErrorId : Microsoft.SharePoint.PowerShell.SPCmdletGetWeb
    You verify that you are running the script in the SharePoint Management Shell as Administrator.  You also verify that the user account you are logged in as is a member of the Farm Administrators group and that it is the Primary site collection administrator for the root site collection of the My Site web application.

    Solution
    • Configure a new User Policy for the My Site web application that grants your administrator account Full Control to all the site collections in this web application:
    1. Login to the farm's Central Administration as a farm administrator.
    2. Navigate to: Application Management > Web Applications > Manage Web Applications.
    3. Select the target web application.  This will enable the options on the Web Applications ribbon.
    4. Click the User Policy button.
    5. Click Add Users.
    6. Click Next.
    7. Enter a username, select Full Control, and then click Finish.  When adding the username, be sure to prefix it with i:0#.w|.  So, for example, DOMAIN\John.Smith would be entered as:
      i:0#.w|DOMAIN\john.smith
    8. Open a fresh SharePoint Management Shell as Administrator and re-run the script.
    References
    Notes
    • An account added to the SharePoint Farm Administrators group is not automatically granted access to a farm web application or to user sites.  A SharePoint Farm Administrator can, however, add himself to a site collection's Site Collection Administrators group and thereby gain administrative access to that site collection and all of its subsites.
    • Administrators of site collections and sites must be members of the Site Collection Administrators group or of the site Administrators group.  A member of the Site Collection Administrators group has administrative access to all sites and subsites within the site collection.
    • This issue can also affect the results you get when you use PowerShell to harvest My Site metrics.  For example, running this command
      Get-SPWebApplication http:/[MySiteURL] | Get-SPSite -Limit All | Select URL, @{Expression={$_.Usage.Storage/1024/1024}}
      will return a list of "0" for the storage values for all My Sites for which your administrator account is not configured as the Site Collection Administrator.

    SharePoint 2013: there was an error during installation

    $
    0
    0
    Problem

    You are attempting to install SharePoint Server 2013 prerequisites to a Windows Server 2012 virtual machine on Hyper-V.  The server has Internet access.  You run PrerequisiteInstaller as Administrator.  Part way through the installation process, the prerequisite installer stops and displays the usual prerequisite installation error dialog:

    Troubleshooting
    1. Action: Reviewed prerequisite installer log file.
      1. Results: saw the following error in this file:
        Error: The tool was unable to install Application Server Role, Web Server (IIS) Role.
    2. Action: Searched for this error text.
      1. Results: references 1 and 2 (below) seemed to suggest for my environment that this error involved PrerequisiteInstaller not being able to access the Internet to download appropriate prerequisites. 
    3. Action: opened browser and connected to known accessible website.
      1. Result: successfully connected to website.
      2. Observation: Internet connectivity established, but noted that IE Enhanced Security Settings were enabled.  Perhaps IE Enhanced Security Settings might play a role.
    4. Action: disabled IE Enhanced Security Settings, and then re-ran PrerequisiteInstaller.
      1. Result: still failed.
      2. Observation: perhaps Firewall played a role.
    5. Action: Checked Firewall settings for target server and also for production server currently running older instance of SharePoint (2010).
      1. Results: firewall was set to default settings on target server and on server currently running older instance. Recalled that a development instance was successfully installed without changing default firewall settings.
      2. Observation: firewall settings not likely the cause.  Internet connectivity not likely the cause.
    6. Action: searched again for error text.
      1. Results: reference 3 seemed to suggest that the issue may be permissions-related; considered tweaking GPO, but wanted to avoid making such modifications.  References 4, 5 and 6 seemed to indicate that for some reason the PrerequisiteInstaller was not able to install the Application Server and Web Server (IIS) roles on Windows Server 2012 and that therefore these should be installed manually.
    7. Actions: Added Application Server and Web Server roles per reference 6; then re-ran PrerequisiteInstaller.
      1. Results: still failed, but noted that PrerequisiteInstaller seemed to run for longer period before failing.
    8. Actions: searched again for error text.
      1. Results: reference 7 seemed to indicate that perhaps just need to run aspnet_regiis -enable -i, but for .NET version 4.0.  I recalled that I have had to do this for previous 2010 installations that experienced problems on installation and this resolved it.
    9. Action: ran aspnet_regiis -enable -i command, at console, as administrator.
      1. Results: the command did not fail, but simply presented help instructions.
    10. Action: searched again for error text.
      1. Results: found reference 8.  Copy of PrerequisiteInstaller log file was displayed in reference.  This log file included the original error message I identified above (see step 1, above).  Additionally, it highlighted an error message that I had apprently overlooked: Error when enabling ASP.NET v4.0.30319.  This reference also had a link to another reference, 9, which was touted as the solution.
    11. Action: Performed the steps in reference 9.  These steps added ASP.NET 3.5. 
      1. Results: Installed.
    12. Action: restarted PrerequisiteInstaller.exe.
      1. Results: completed without issue.
    Solution
    • Prior to running the PrerequisiteInstaller, install the Application and Web Server roles manually.  During the installation of the Web Server role, be sure to check the ASP.NET 3.5 feature.
    References
    1. SharePoint 2013: Install Prerequisites Offline or Manually on Windows Server 2012 - A Comprehensive Guide
    2. The Products Preparation Tool in SharePoint Server 2013 may not progress past "Configuring Application Server Role, Web Server (IIS) Role
    3. SharePoint 2013 Pre requisites install fail, Error: The tool was unable to install Application Server Role, Web Server (IIS) Role
    4. SharePoint 2013 pre-requisite: Application and Web Server Role configuration error
    5. Installing SharePoint 2013 on Windows Server 2012 R2 *RTM*
    6. Installing SharePoint 2013 on Windows Server 2012 R2 Preview
    7. The tool was unable to install Application Server Role, Web Server (IIS) Role
    8. Trying to install SharePoint 2013 on server 2012 Unable to install the application to web server IIS
    9. IIS 8.0 Using ASP.NET 3.5 and ASP.NET 4.5
    10. SharePoint 2013 SP1 support in Windows Server 2012 R2
    11. Error The tool was unable to install Application Server Role, Web Server IIS Role Last return code 0X41D=1053.

    SharePoint 2013: Start-CacheHost : Cannot start service AppFabricCachingService on computer

    $
    0
    0
    Problem

    You have two AppFabric hosts in your SharePoint Server 2013 farm and want to add a third.  After adding this host, you find that the new host status is DOWN.  You try starting the service first using the usual Start- CacheHost command, but this fails.  When you try starting it through the Services control panel, it does start up, but then stops after a few minutes.  You then check the CacheClusterConfiguration file and see all three hosts there and configured correctly.  But when you check the health stats (Get-CacheClusterHealth), only the two original hosts are shown.

    Solution
    • After adding a new cache host, stop and then start the CacheCluster.
    References
    Notes
    • Thanks to Marco van Wieren and his post for providing the clue needed for solving this.
    • Here's the process I went through to add the instance and troubleshoot:
      1. I first added the instance by executing the following script on the target new AppFabric host:

        $SPFarm = Get-SPFarm
        $cacheClusterName = "SPDistributedCacheCluster_" + $SPFarm.Id.ToString()
        $cacheClusterManager = [Microsoft.SharePoint.DistributedCaching.Utilities.SPDistributedCacheClusterInfoManager]::Local
        $cacheClusterInfo = $cacheClusterManager.GetSPDistributedCacheClusterInfo($cacheClusterName)
        $instanceName ="SPDistributedCacheService Name=AppFabricCachingService"
        $serviceInstance = Get-SPServiceInstance | ? {($_.Service.Tostring()) -eq $instanceName -and ($_.Server.Name) -eq $env:computername}
        if([System.String]::IsNullOrEmpty($cacheClusterInfo.CacheHostsInfoCollection)) {Add-SPDistributedCacheServiceInstance;
        $cacheClusterInfo.CacheHostsInfoCollection}

      2. After this, I executed Use-CacheCluster followed by Get-CacheHost to check service status. The results were that my two existing hosts were UP while the new one was DOWN.  I then executed the following script to spot check the new host's service instance status:
        $instanceName ="SPDistributedCacheService Name=AppFabricCachingService"
        $serviceInstance = Get-SPServiceInstance | ? {($_.service.tostring()) -eq $instanceName -and ($_.server.name) -eq $env:computername}
        $serviceInstance
        The result was that the new service instance status is Online. 
      3. I then decided to check the service instance status of all hosts in the farm using this script:
        Get-SPServiceInstance | ? {($_.service.tostring()) -eq "SPDistributedCacheService Name=AppFabricCachingService"} | select Server, Status
        The results were that all service instances were Online.
      4. I then checked the cluster configuration by exporting the configuration file using this script:
        export-cacheclusterconfig C:\CacheClusterConfig.txt
        All three hosts were identified in this file and the configuration information for each seemed to be correct.
      5. Next, I checked the health metrics by executing this script:
        Use-CacheCluster
        Get-CacheClusterhealth
        Oddly, this showed that the two existing hosts were perfectly healthy, but it did not mention anything about the new one I had just added.
      6. I then checked all of the caches using this script:
        Get-Cache
        The results of this were a listing of the names of all of the caches, but this listing only showed the caches for the two existing hosts and nothing for the new one.
      7. Next, I checked the configuration of the new host using this script:
        Get-CacheHostConfig
        The result showed a CacheSize of 1124 MB, which was significantly higher than any of the CacheSizes for the other hosts.
      8. Thinking that this might be the issue, I stopped the cluster, set the new CacheSize and then started the cluster using this script:
        Stop-CacheCluster
        Set-CacheHostConfig -Hostname OCS-VS-BAT13D1 -CachePort 22233 -CacheSize 300
        Start-CacheCluster
      9. I then checked the service status of all hosts, using Get-CacheHost, and this time all instances reported back UP status.
      10. It wasn't clear to me whether it was setting the CacheSize to a lower value or stopping and starting the cache cluster that resolve the issue.  So, I stopped the cluster, set the CacheSize back to 1124 MB, and then started the cluster and checked service statuses again: they were all up.
      11. Therefore, it was stopping and starting the cache cluster that enabled the new host to fully integrate with the cluster.

    SharePoint 2013: How to Restore Content Databases

    $
    0
    0
    Introduction

    This posting walks you through the process of restoring one or more content databases to a SharePoint Server 2013 farm web application.  This procedure can be used to restore a production farm web application or even to "refresh" a 2013 development environment with the latest content from the production site, via just the production site content databases or a backup of these databases.  It assumes a farm having a single SQL Server database.

    Procedure
    1. Identify the web application that you want to restore.
    2. Identify the content database(s) of this web application and their location.
    3. Logon as administrator (not the farm administrator) to the SQL Server of the target farm.
    4. Create a local folder, and copy to this folder the full backups of the content databases that you want to restore.
    5. Logout.
    6. Login as the Farm Setup User Administrator account (eg, spAdmin) to a SharePoint server of the target farm.
    7. Launch Central Administration
    8. Navigate to Application Management > Databases > Manage content databases.
    9. Select the appropriate web application from the Web Application dropdown.
    10. Click on the title of a content database.
    11. Enable the option, Remove content database, and then click OK at the popup prompt.
    12. Click OK again.
    13. Logout.
    14. Login to the target farm's SQL Server as administrator.
    15. Launch SQL Server Management Studio with elevated privileges (right-click).
    16. In Object Explorer, expand the tree to find the content databases.
    17. Right-click, point to Tasks and then click Detach...
    18. Select the database to be detached.
    19. Enable the Drop Connections option, and then click OK.
    20. Repeat for each content database associated with this web application.
    21. Open Windows Explorer, and then navigate to the folder containing the SQL Server databases.  This will usually be of the form:
      [Drive]:\Program Files\Microsoft SQL Server\MSSQL11.MSSQLSERVER\MSSQL\DATA
    22. Rename the content database(s) and associated transaction log files.
    23. In SQL Server Management Studio, in Object Explorer, right-click Database, and then click Restore Database...
    24. Select Device, and then click the ellipses "..."
    25. Click the Add button.
    26. Navigate to the folder where you placed the content database(s) that you want to restore.
    27. Select a content database.
    28. Click OK.
    29. Click OK again.
    30. Wait until the restore operation is completed.
    31. In Object Explorer, right-click Databases, and then click Refresh.
    32. Verify that the newly restored database is listed.
    33. Repeat steps 23-32 for each content database.
    34. Exit SQL Server Management Studio.
    35. Logout of the SQL Server host.
    36. Login, as the farm Setup User Administrator account to any SharePoint server in the target farm.
    37. Launch an instance of the SharePoint 2013 Management Shell with elevated privileges (right-click).
    38. Execute the following script for each content database you need to restore:
      Mount-SPContentDatabase "[content database name]" -DatabaseServer "[database server name or alias]" -WebApplication [URL]
      NOTE: use Mount-SPContentDatabase; not Restore-SPFarm.  You are "restoring" a content database, not a site.
    39. After completing these mount operations, the restored web application should become available immediately.
    References
    Notes
    • The terminology here is understandably confusing.  The procedure presented in this posting effectively accomplishes a restore operation.  However, technically speaking, you are really only performing unmount and mount operations on content databases. 
    • Also, Attach and Detach operations performed on SQL Server accomplish different things  than performing these operations through Central Administration.  A Detach operation performed through Central Administration detaches the content database from the SharePoint farm; it does not detach it from SQL Server.
    • Don't worry if your content databases contain multiple site collections distributed among multiple content databases that these won't be properly integrated back into one web application: just mount them all up and SharePoint Server will figure out the rest.
    • While you can also mount the content databases through Central Administration, I have found from experience that after doing it this way, not all my site collections will become visible and I may have to unmount and mount a content database several times this way before things finally work out. Why this is, I don't know.

    SharePoint 2013: How to expand server disks on HyperV

    $
    0
    0
    Introduction

    This posting walks through the process of expanding a SharePoint Server system disk for Windows Server 2012 servers hosted on Hyper-V.

    Procedure
    1. Compile a listing:
      1. Name of SharePoint server
      2. Current disk sizes
    2. Shutdown all servers on this list (PowerShell: Shutdown /s)
    3. Launch Hyper-V Manager
    4. Connect to the appropriate Hyper-V host.
    5. Under Virtual Machines, select the SharePoint server.
    6. In the Actions panel, click Edit Disk...
    7. Navigate to the folder containing the virtual disk file, and then select this file.
    8. Click Open.
    9. Click Next.
    10. Select the Expand option, and then click Next.
    11. Click Finish.
    References
    Notes
    • The expanded disk is available immediately.

    SharePoint 2013 OWA: Server Error: We're sorry. An Error has occurred. We've logged the error...

    $
    0
    0
    Problem

    Users attempt to view online a Microsoft Office document in a site library, but experience the following error:
    This error is seen when attempting to view any type of Office document.  You then login to the Office Web Apps 2013 server, view its Application log, and find it rapidly filling up with multiple versions of Event IDs 1000 and 1026, such as:
    Log Name:      Application
    Source: Application Error
    Date: [date/time]
    Event ID: 1000
    Task Category: (100)
    Level: Error
    Keywords: Classic
    User: N/A
    Computer: [OWA servername]
    Description:
    Faulting application name: BroadcastWatchdog_App.exe, version:
    15.0.4502.1000, time stamp: 0x512d264c
    Faulting module name: KERNELBASE.dll, version: 6.2.9200.16864,
    time stamp: 0x531d34d8
    Exception code: 0xe0434352
    Fault offset: 0x0000000000047b8c
    Faulting process id: 0x1b54
    Faulting application start time: 0x01cfa51426c90393
    Faulting application path: C:\Program Files\Microsoft Office Web
    Apps\BroadcastServicesWatchdog_App\BroadcastWatchdog_App.exe
    Faulting module path: C:\Windows\system32\KERNELBASE.dll
    Report Id: 6525fef4-1107-11e4-93ff-00155d38891e
    Faulting package full name:
    Faulting package-relative application ID:
    Event Xml:
    and
    Log Name:      Application
    Source: Application Error
    Date: [date/time]
    Event ID: 1000
    Task Category: (100)
    Level: Error
    Keywords: Classic
    User: N/A
    Computer: [OWA servername]
    Description:
    Faulting application name: Microsoft.Office.Excel.Server.EcsWatchdog.exe,
    version: 15.0.4511.1000, time stamp: 0x5164ab86
    Faulting module name: KERNELBASE.dll, version: 6.2.9200.16864,
    time stamp: 0x531d34d8
    Exception code: 0xe0434352
    Fault offset: 0x0000000000047b8c
    Faulting process id: 0x49c
    Faulting application start time: 0x01cfa51428fbb3ad
    Faulting application path: C:\Program Files\Microsoft Office Web
    Apps\ExcelServicesEcsWatchdog\Microsoft.Office.Excel.Server.EcsWatchdog.exe
    Faulting module path: C:\Windows\system32\KERNELBASE.dll
    Report Id: 66efc6c6-1107-11e4-93ff-00155d38891e
    Faulting package full name:
    Faulting package-relative application ID:
    Event Xml:
    and
    Log Name:      Application
    Source: .NET Runtime
    Date: [date/time]
    Event ID: 1026
    Task Category: None
    Level: Error
    Keywords: Classic
    User: N/A
    Computer: [OWAservername]
    Description:
    Application: WordViewerAppManagerWatchdog.exe
    Framework Version: v4.0.30319
    Description: The process was terminated due to an unhandled exception.
    Exception Info: System.TypeInitializationException
    Stack:
    at Microsoft.Office.Web.Common.ServiceInstanceFinder.
    GetLocalAgentInstance(Microsoft.Office.Web.Common.OfficeServiceType)
    at Microsoft.Office.Web.Common.WatchdogHelper.PrepareRegistrations
    (Microsoft.Office.Web.Common.OfficeServiceType)
    at Microsoft.Office.Web.Common.WatchdogHelper.WatchMachines
    (Microsoft.Office.Web.Common.OfficeServiceType, CheckServiceInstance,
    Microsoft.Office.Web.Common.OfficeServiceType, System.String)
    at Microsoft.Office.Web.WordViewerWatchdog.Program.Main()
    Event Xml:
    and many others of a similar nature.  You recall that you recently installed updates to the OWA server, via Systems Center Configuration Manager (SCCM), and that some of these involved OWA.

    Discussion

    Applying updates to Office Web Apps server via SCCM or Windows Updates is not supported and may cause service application failure and loss of OWA functionality to all your users.  Recovery from this situation involves rebuilding the entire OWA service application and its bindings to the SharePoint farm; as well as modifications to your organization's Windows patching SOP. 

    Total Solution Time Estimate: 3 hours.

    Solution
    1. Login to any server in the farm that hosts SharePoint 2013, under the Setup User Administrator account (eg, spAdmin). 
      NOTE: always use the SharePoint Setup User Administrator account for any SharePoint installation and configuration activities.
    2. Open a SharePoint Management Shell with elevated privileges (as administrator).
    3. Execute the following:
      Remove-SPWOPIBinding
      This removes the Office application bindings that SharePoint has to the OWA server.
    4. Logout of the SharePoint server.
    5. Login under any administrator account to the OWA server.
    6. Open a PowerShell window with elevated privileges (as administrator).
    7. Execute the following:
      Import-Module -Name OfficeWebApps
      Remove-OfficeWebAppsMachine
      This doesn't uninstall the OWA software; it only removes the local OWA server from the OWA farm. 
      NOTE: if you have more than one OWA server in the OWA farm, you must first execute this command on each of the child OWA servers first.  Then you can execute this command on the final, master OWA server.
    8. Uninstall the software using standard Windows uninstallation method.
      NOTE: you must uninstall the OWA software and rebuild fresh due to how the updates were previously installed.  Uninstalling the OWA software will also get rid of the updates.
    9. Restart the OWA server.
    10. Re-install OWA.
    11. Re-install updates.
    12. Restart the OWA server.
    13. Login to the OWA server under an administrator account.
    14. Open a PowerShell window with elevated privileges (as administrator).
    15. Execute the following:
      Import-Module -Name OfficeWebApps
      New-OfficeWebAppsFarm -InternalURL "http://servername" -AllowHttp -EditingEnabled
      where servername is the actual name of the OWA server host machine.  Do not use the fully qualified name.  Executing this command creates a new OWA farm.
    16. Next, execute the following:
      Get-OfficeWebAppsMachine
      This returns the Roles and health status of the local OWA server.  For my OWA farm, I wanted the roles to be All and health status Healthy.
    17. Logout of the OWA server.
    18. Open any browser, and then connect to the following:
      http:/servername/hosting/discovery
      If everything's working correctly, you will see the service discovery file in XML format.
    19. Login to any SharePoint farm server (hosting SharePoint), using your farm's SharePoint Setup User Administrator account.
    20. Open a SharePoint Management Shell with elevated privileges (as administrator).
    21. Execute the following:
      Get-SPWOPIBinding
      This should return nothing, since all WOPI bindings should have been removed back in step 3.  If it doesn't, execute Remove-SPWOPIBinding.
    22. In this same SharePoint Management shell, execute the following:
      New-SPWOPIBinding -ServerName <WacServerName> -AllowHTTP
      where ServerName is the actual name of the OWA server host machine. Do not use the fully qualified name.  This command builds the bindings in SharePoint to the OWA service application.
    23. In this same SharePoint Management shell, execute the following:
      Get-SPWOPIBinding
      This should now return a list of Office applications and actions and their bindings.
    24. In the same SharePoint Management shell, execute the following:
      Get-SPWOPIZone
      This should return internal-http, given the WOPI authentication type that was configured in step 22, "-AllowHTTP."
    25. In the same SharePoint Management shell, execute the following:
      (Get-SPSecurityTokenServiceConfig).AllowOAuthOverHttp
      This should return True, if you are not using HTTPS for connections to your farm.
    26. OWA services should be available immediately, and you can test right away.
    References
    Notes
    • This solution assumes a single-server internal OWA farm that exposes its service over HTTP (not HTTPS) for an internal corporate environment and that has Microsoft Office volume licensing.
    • It also assumes an internal SharePoint 2013 farm that uses authentication over HTTP and does not employ encrypted connections.

    SharePoint 2013: how to remove a cache host from an unrecoverable farm server

    $
    0
    0
    Introduction

    This posting walks through the steps necessary for removing a distributed cache host from a SharePoint farm server that has been removed, terminated, or is otherwise unrecoverable.

    Procedure
    1. Preparation
      1. Identify the name of the unrecoverable cache host (eg, SERVER1).
      2. Identify the connection string used by the distributed cache service to connect to the farm database:
        1. On any farm server hosting SharePoint, launch a command prompt with elevated privileges.
        2. Execute regedit.
        3. Navigate to: HKLM\SOFTWARE\Microsoft\AppFabric\V1.0\Configuration.
        4. Open a new NotePad instance.
        5. Copy the contents of the ConnectionString parameter to NotePad.
        6. Remove the last parameter of this string, or ";Enlist=False" including the ";".
        7. Save this text; you'll need it later.
    2. Connect
      1. Login to a SharePoint farm server as the SharePoint Setup User Administrator account.
      2. Launch the SharePoint 2013 Management Shell with elevated privileges.
    3. Check cache status
      1. Execute Use-CacheCluster and then Get-CacheHost to check current distributed cache status.
    4. Unregister the cache host:
      1. Execute Unregister-CacheHost -HostName
      2. At the prompt for ProviderType, enter SPDistributedCacheClusterProvider.
      3. At the prompt for ConnectionString, enter the string you saved back in Preparation step 1.7.  Unregistration takes only a few seconds.
    5. Check cache status
      1. Execute Get-CacheHost to check current distributed cache status.  The target cache host should no longer be listed.
      2. Execute Stop-CacheCluster followed by Start-CacheCluster: these commands should complete without any errors and without the target cache host being listed.
    References
    Notes
    • Stop-CacheCluster: There's no need to bring down the cache cluster before unregistering the target cache host.  if you do first bring it down, and then try to execute the Unregister-CacheHost command, you may experience an error:
      Unregister-CacheHost : ErrorCode<ClusterNotInitialized>: SubStatus<ES0001>:No cluster configuration is present in target.
      .
    • Unregister-CacheHost: Don't use the Unregister-CacheHost format presented in the Windows Server AppFabric Caching Deployment and Management Guide, page 13.  This won't work.  Instead, use the steps I've provided in the Unregister the cache host section, above.
    • Servers in Farm: you may need to remove the target server from the farm.

    SharePoint 2013: How to Rebuild an OWA farm

    $
    0
    0
    Introduction

    This posting walks through the process of rebuilding Office Web App (OWA) services for a SharePoint 2013 farm.  Rebuilding an OWA farm is simple and quick and is sometimes the most efficient method for recoverying from severe errors or service failures. 

    This posting assumes a single-server internal OWA farm that exposes its service over HTTP (not HTTPS) for an internal corporate environment and that has Microsoft Office volume licensing.  It also assumes an internal SharePoint 2013 farm that uses authentication over HTTP and does not employ encrypted connections.

    Procedure
    1. Remove SharePoint Bindings
      1. Login to any server in the farm that hosts SharePoint 2013, using the Setup User Administrator account (eg, spAdmin).
        NOTE: always use the SharePoint Setup User Administrator account for any SharePoint installation and configuration activities.
      2. Open a SharePoint Management Shell with elevated privileges (as administrator).
      3. Execute the following:
        Remove-SPWOPIBinding
        This removes the Office application bindings that SharePoint has to the OWA server.
      4. Logout of the SharePoint server.
    2. Remove the OWA server from the farm
      1. Open a PowerShell window with elevated privileges (as administrator).
      2. Execute the following:
        Import-Module -Name OfficeWebApps
        Remove-OfficeWebAppsMachine
        This doesn't uninstall the OWA software; it only removes the local OWA server from the OWA farm.
        NOTE: if you have more than one OWA server in the OWA farm, you must first execute this command on each of the child OWA servers first. Then you can execute this command on the final, master OWA server.
    3. Re-install OWA Server
      1. Uninstall the software using standard Windows uninstallation method.
        NOTE: you must uninstall the OWA software and rebuild fresh due to how the updates were previously installed. Uninstalling the OWA software will also get rid of the updates.
      2. Restart the OWA server.
      3. Re-install OWA.
      4. Re-install updates.
      5. Restart the OWA server.
    4. Build new OWA farm
      1. Login to the OWA server under an administrator account.
      2. Open a PowerShell window with elevated privileges (as administrator).
      3. Execute the following:
        Import-Module -Name OfficeWebApps
        New-OfficeWebAppsFarm -InternalURL "http://servername" -AllowHttp -EditingEnabled
        where servername is the actual name of the OWA server host machine. Do not use the fully qualified name. Executing this command builds a new OWA farm.
      4. Next, execute the following:
        Get-OfficeWebAppsMachine
        This returns the Roles and health status of the local OWA server. For my OWA farm, I wanted the roles to be All and health status Healthy.
      5. Logout of the OWA server.
      6. Open any browser, and then connect to the following:
        http:/servername/hosting/discovery
        If everything's working correctly, you will see the service discovery file in XML format.
    5. Add SharePoint Bindings
      1. Login to any SharePoint farm server (hosting SharePoint), using your farm's SharePoint Setup User Administrator account.
      2. Open a SharePoint Management Shell with elevated privileges (as administrator).
      3. Execute the following:
        Get-SPWOPIBinding
        This should return nothing, since all WOPI bindings should have been removed back in step 3. If it doesn't, execute Remove-SPWOPIBinding.
      4. In this same SharePoint Management shell, execute the following:
        New-SPWOPIBinding -ServerName <WacServerName> -AllowHTTP
        where ServerName is the actual name of the OWA server host machine. Do not use the fully qualified name. This command builds the bindings in SharePoint to the OWA service application.
      5. In this same SharePoint Management shell, execute the following:
        Get-SPWOPIBinding
        This should now return a list of Office applications and actions and their bindings.
      6. In the same SharePoint Management shell, execute the following:
        Get-SPWOPIZone
        This should return internal-http, given the WOPI authentication type that was configured in step 22, "-AllowHTTP."
      7. In the same SharePoint Management shell, execute the following:
        (Get-SPSecurityTokenServiceConfig).AllowOAuthOverHttp
        This should return True, if you are not using HTTPS for connections to your farm.
      8. OWA services should be available immediately, and you can test right away.
    References

    SharePoint 2013: How to Audit Collaboration Sites

    $
    0
    0
    Introduction

    This posting walks through the process of configuring auditing for a collaboration site collection.  It engages the scenario where: as the farm administrator, you want to push down administration of collaboration sites but you still want to monitor critical activities, such as permission change and content deletions.

    Procedure
    1. Navigate to the collaboration site.
    2. Go to: Settings > Site Settings.  Look for Site collection audit settings.
    3. Click this link.  Look for Automatically trim the audit log for this site?
    4. Select Yes.
    5. Enter 30
      Note: you will not actually obtain a report until this amount of days have passed.  Therefore, if you want to obtain these report files on a more timely basis, set this to a smaller number of days.
    6. Click the Browse... button.  A popup will appear.
    7. Select the document library where you want the audit log stored to.  For this example, the Customized Reports document library was selected. 
    8. Click OK.  The relative URL to this library is inserted.  Note that the popup displays Customized Reports, but that the URL to this library seems to call it AnalyticReports.
    9. Enable the Deleting or restoring items and Editing users and permissions checkboxes. 
      The audit data generated by these two events will be sufficient for me as the administrator to track significant activities involving the collaboration site.
    10. Click OK.  After the number of days specified previously has passed, you will see the audit file appear in the document library you designated.
    References
    Notes

    SharePoint 2013: Chart Web Part Missing

    $
    0
    0
    Introduction

    Sometimes, the Chart web part may not appear, even after you enable the Publisher Infrastructure.  Or, maybe you want to add the chart web part without having to enable Publisher Infrastructure.  This posting shows you how.

    Procedure
    1. Login to any farm server hosting SharePoint as a Site Collection Administrator.
    2. Go to: Settings > Site Settings > Go to top level site settings > Web Designer Galleries > Web parts.
    3. Click the FILES tab.
    4. Click New Document.
    5. Scoll down the list and look for: Microsoft.Office.Server.WebControls.ChartWebPart.
    6. Check this item.
    7. Scroll back up to the top, and then click the Populate Gallery button.
    8. Wait for it to refresh.
    9. Scoll down the list and look for: ChartWebPart.webpart.
    10. Click its Edit button.
    11. Enter the value, Content Rollup, or enter any other web part group value appropriate to your needs.
    12. Click Save.
    13. That's it.  The next time you open a web page in edit mode and search for a web part to add to it, you'll see the Chart web part there.
    References
    Notes
    • Content Rollup may not appear in the Group dropdown list.  But don't worry, just enter the text for a group that you know exists, and it will appear in that list the next time you edit a page and look for the web part.

    SharePoint 2013: The exclusive inplace upgrader timer job failed

    $
    0
    0
    Problem

    You run the SharePoint Products Configuration Wizard, after installing patches.  The Wizard runs through configuration steps 1 - 8 without issue, but then fails on step 9.  You review the diagnostics log (PSCDiagnostics_...) and see the following error message:
    The exclusive inplace upgrader timer job failed. 
    You then review the Upgrade log and see the following:
    08/16/2014 23:46:36.44 OWSTIMER (0x2F90) 0x1330 SharePoint Foundation Upgrade SPContentDatabaseSequence al2pi ERROR Error running SQL DDL Script:                   IF  EXISTS (SELECT TOP 1 1 FROM sys.database_principals WHERE name = N'db_owner' A.... System.Data.SqlClient.SqlException (0x80131904): Cannot alter the role 'db_owner', because it does not exist or you do not have permission.   


    Procedure
    1. Identify SharePoint Timer service account
      1. Login to any machine in the farm hosting SharePoint.
      2. Open the Services control panel.
      3. Scroll down to the SharePoint Timer Service
      4. Identify the account running this service (this will usually be the SharePoint farm service account, eg, spFarm).
      5. Logout
    2. Update farm service account database mapping
      1. Login to the farm's SQL Server as an administrator
      2. Open SQL Server Management Studio
      3. Expand Security > Logins
      4. Double-click on the farm service account
      5. In the left-hand Select a page panel, select User Mapping
      6. In the right Results panel, select each database in turn and check to see whether the db_owner checkbox is checked.  Don't worry about the system databases (master, model, msdb, tempdb), nor the workflow databases (eg, sbGatewayDatabase, WFInstanceManagement)
      7. Click OK.
      8. Re-run the Products Configuration Wizard.
    References
    Notes
    • Thanks to Bernado Nguyen-Hoan for posting the original solution to this problem.
    • Bernado implemented this solution by granting the farm service account the sysadmin role to the database server.  While this certainly works, a least-permissions approach is what I took, ensuring that the farm service account was granted dbo permissions to all farm databases.
    • This problem was encountered after installing the August 2014 PU patches for SharePoint 2013.

    SharePoint 2013: How to install updates using PatchIt

    $
    0
    0
    Introduction

    Patching can take longer on SharePoint 2013 than previously experienced with 2010.  Use Russ Maxwell's PowerShell script to significantly reduce the amount of time consumed by patching SharePoint.  This posting presents the simple steps necessary for using his script and includes AlsTechTips notes from the field.

    Procedure
    1. Preparation
      1. Login to a SharePoint server using any administrator account. 
      2. Copy the update executables to a local folder on each server hosting SharePoint Server 2013.  Call it updates.
      3. Add another folder off the root system drive.  For this posting, the new folder is called patchit.
      4. Copy the script file PatchIt.PS1 to this folder.
      5. Logout of the machine.
      6. Repeat this for each server in the farm hosting SharePoint Server 2013.
    2. Installation
      1. Logon to the first WFE using the SharePoint Setup User Administrator account (eg, spAdmin).
        NOTE: it is imperative that you login using this account and perform the update installation using this account.  Not doing so may introduce subtle inconsistencies into SharePoint operations that may lead to odd and confusing behavior difficult to troubleshoot and resolve.
      2. Copy the first update executable to the folder containing PatchIt.PS1. 
        NOTE: only one update executable can be in this folder at a time.  PatchIt can only install one update at a time.
      3. Launch the SharePoint Management Shell with elevated privilege (as administrator).
      4. Navigate to the patchit folder containing PatchIt.PS1.
      5. Execute the following:
        .\PatchIt.PS1
        After a few moments, you may be presented with the usual licensing terms prompt
      6. Check the box, and then click Continue.
      7. A new prompt will appear, Open File - Security Warning, requesting permission to run the file.
      8. Click Run.  You will see various messages appearing in the shell, as Search and other services stopped; then the patch is installed; and then Search is started.
      9. Repeat for each update that needs to be installed.
      10. Logoff
      11. Repeat for each SharePoint Server that needs to be updated.
    References
    Notes
    • Thanks to Russ Maxwell for making this outstanding script available to the SharePoint IT community.
    • If the Search Service application is not installed, there's no need to choose option 1 after launching PatchIt.  If you do, you'll see the error, You cannot call a method on a null-valued expression.  But don't worry: this error can be ignored, as the script will proceed past this.
    • If you see the following error message appear in the management shell,
      get-process : Cannot find a process with the name "[process name]". Verify the process name and call the cmdlet
      don't worry: it just means that the update is already installed or unnecessary.
    • If, after installing updates, you launch the SharePoint Products Configuration Wizard, and the Wizard informs you that a patch hasn't been installed that you know you just now installed using PatchIt, don't worry: 1) exit the Wizard; 2) manually install the update by right-clicking on it and choosing Run as Administrator; run through the entire process: it will eventually inform you that it doesn't need to be installed; that's OK: when you close that last prompt, the system will be updated to recognize that the path was installed; and finally step 3), re-run the Products Configuration Wizard.
    • Listed below are times and durations captured for a typical update session.  Start was 7:30 PM
      • WFE1 (1:05hr)
        • Preparation: 7:30PM (20m)
        • KB2880994: 7:50PM (13m)
        • KB2881034: 8:01PM (8m - not installed)
        • Review: 8:10PM (15m)
        • KB2760319: 8:25PM (5m)
        • KB2880998: 8:30PM (11m)
        • Reboot: 8:31PM (2m)
        • Run WU: 8:35PM (2m)
      • WFE2 (45m)

    SharePoint 2013: Product / patch installation or server upgrade required (BDC)

    $
    0
    0
    Problem

    You perform a standard update of the farm, applying patches and then running the SharePoint Products Configuration wizard on all SharePoint servers.  The patches are installed and the Wizard complete successfully without issues on all servers.  However, a little while later, you find the following entry in the SharePoint 2013 Central Administration Review problems and solutions All Reports listing:

    TitleProduct / patch installation or server upgrade required.
    Severity1 - Error
    CategoryConfiguration
    ExplanationAll required products must be installed on all servers in the farm, and all products should have the same patching and upgrade level across the farm.

    Upgrade is required on server [ServerName]. Without the upgrade, the server is not in a supported state
     
    RemedyOn server [ServerName], once all required products and/or patches are installed, perform an upgrade by either running PSConfigUI.exe or by executing the command "PSConfig.exe -cmd upgrade -inplace b2b -force -cmd applicationcontent -install -cmd installfeatures". If a former upgrade attempt has failed, you may need to resolve upgrade specific issues before attempting upgrade again.  Refer to the upgrade status page (http:/ocs-vs-bat13d1:5000/_admin/UpgradeStatus.aspx) for information about current and prior upgrade attempts, and to determine issues that may be preventing upgrade from succeeding. For more information about this rule, see [URL].
    Failing Servers 
    Failing ServicesSPTimerService (SPTimerV4)
    Rule SettingsView
     
    You then check Upgrade and Migration > Review database status and see that the Health Analyzer message applies to just one database, a service application database for Business Data Connectivity (BDC).  You then open a command prompt with elevated privileges (as administrator) and execute the command presented in the health notice (above), but find that this still doesn't resolve the problem.

    Solution
    1. Login as the Setup User Administrator account to any farm server hosting SharePoint 2013.
    2. Open a SharePoint 2013 management shell with elevated privileges (as administrator).
    3. Execute Get-SPDatabase.  This returns a list of all the farm databases, including their IDs.  Look through this list to find the one for the BDC.
    4. Mark its ID, and then past it into Notepad for safekeeping.  Let's refer to it as 1234567890 for this posting.
    5. In the same shell, execute the following:
      (Get-SPDatabase 1234567890).Provision()
      Among other things, this updates the database.
    6. After the command returns, execute the following to check the BDC database status:
      (Get-SPDatabase 1234567890).NeedsUpgrade
      This returns either True or False.
    References
    Notes
    • Mark its ID: to do this, and you don't know how (don't worry: I was in IT for 15 years before I was shown how to do this), click the little icon in the title bar of the shell.  This opens a menu. On this menu, point to Edit, and then select Mark.  Now, click and hold and drag over any text appearing in the shell.  Once you select what you want, just press the ENTER key: it's then pasted into the Windows clipboard.
    • This Health Analyzer issue was experienced after installing the August 2014 PU.
    Viewing all 388 articles
    Browse latest View live


    <script src="https://jsc.adskeeper.com/r/s/rssing.com.1596347.js" async> </script>