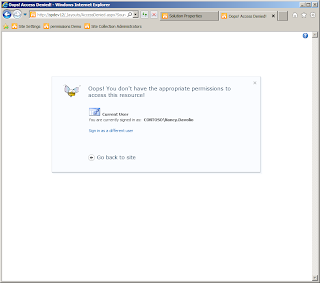
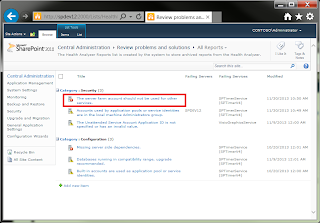
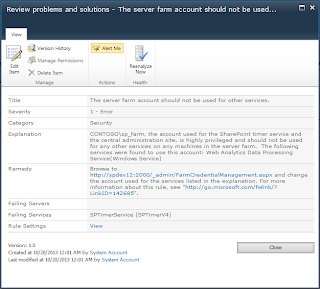
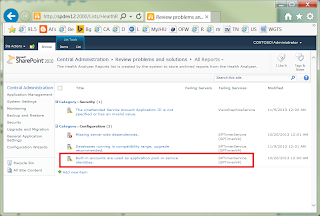
Quantcast
Channel: Al's Tech Tips
Viewing all 388 articles
Browse latest View live

SharePoint 2010: The application-specific permission settings do not grant Local Activation permission

$
0
0
Problem

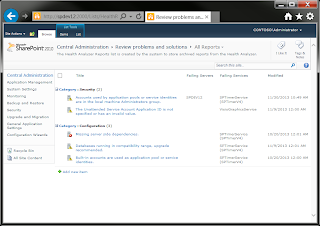
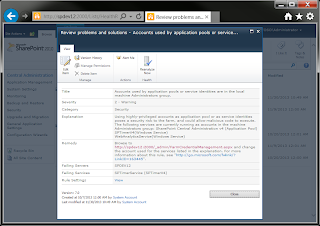
While performing a routine check of the logs of the machine hosting the SharePoint Server 2010 farm Central Administration, I saw the following error in the machine's System log:
Log Name:     System
Source:          Microsoft-Windows-DistributedCOM
Date:             [date]
Event ID:      10016
Task Category: None
Level:            Error
Keywords:     Classic
User:              [DOMAIN\accountname]
Computer:      [FQDN of SharePoint Server 2010 instance]
Description:
The application-specific permission settings do not grant Local Activation permission for the COM Server application with CLSID
{61738644-F196-11D0-9953-00C04FD919C1}
and APPID
{61738644-F196-11D0-9953-00C04FD919C1}
to the user [DOMAIN\accountname] SID [SID for this accountname]... from address LocalHost (Using LRPC). This security permission can be modified using the Component Services administrative tool.
Discussion

Resolving this problem involves the following SharePoint Server 2010 and Windows Server 2008 R2 components:
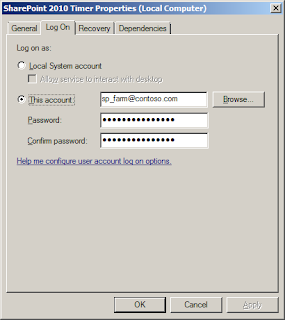
  • SharePoint Server 2010 application service accounts:
    • [DOMAIN\accountname]
  • Local Services:
    • IIS Admin Service
  • Component Services:
    • IIS WAMREG admin  Service
  • Registry Keys:
    • HKEY_CLASSES_ROOT\CLSID\{61738644-F196-11D0-9953-00C04FD919C1}
    • HKEY_CLASSES_ROOT\Wow6432Node\CLSID\{61738644-F196-11D0-9953-00C04FD919C1}
    • HKEY_LOCAL_MACHINE\SOFTWARE\Classes\CLSID\{61738644-F196-11D0-9953-00C04FD919C1}
    • HKEY_LOCAL_MACHINE\SOFTWARE\Classes\Wow6432Node\CLSID\{61738644-F196-11D0-9953-00C04FD919C1}
    • HKEY_LOCAL_MACHINE\SOFTWARE\Wow6432Node\Classes\CLSID\{61738644-F196-11D0-9953-00C04FD919C1}
Resolution
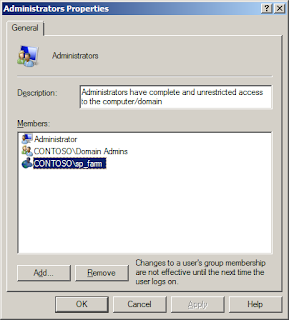
  1. Identify which account you want to use in order to modify the permissions of machine level services, components and registry keys.  For this posting, the local administrator account was used. 
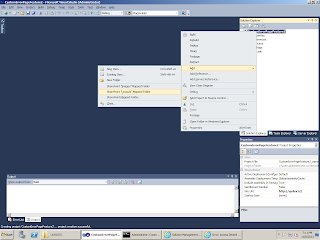
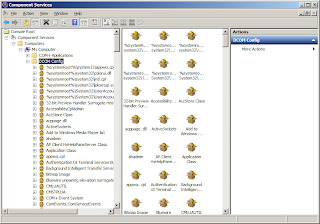
  2. Go: Start > Administrative Tools > Component Services.  The Component Services control panel appears.
  3. In the console tree, expand: Console Root > Component Services > Computer > My Computer > DCOM Config:
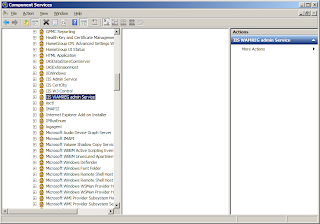
  4. Search for IIS WAMREG admin Service:
  5. Right-click on this component, and then select Properties.  The IISWAMREG admin Service Properties dialog appears, with the General tab selected by default.
  6. If the Authentication Level dropdown displayed on this tab is disabled, continue to the next step.  Otherwise, skip to step 16, below.
  7. Close the Properties dialog and close the Component Services console.
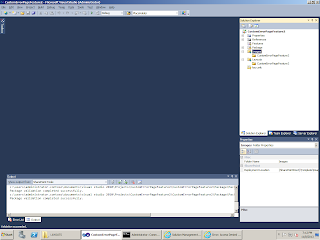
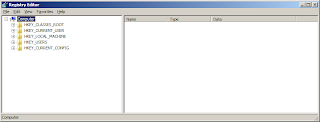
  8. Launch RegEdit.
  9. Save a backup of the current hive.
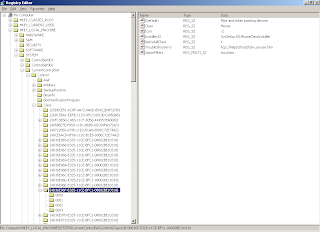
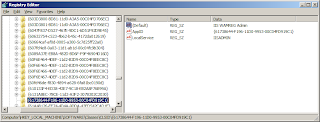
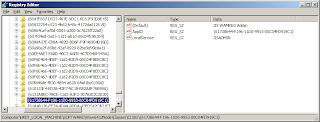
  10. Look for and verify the existence of each of the following keys:
    1. HKCR\CLSID\{61738644-F196-11D0-9953-00C04FD919C1}
    2. HKCR\Wow6432Node\CLSID\{61738644-F196-11D0-9953-00C04FD919C1}
    3. HKLM\SOFTWARE\Classes\CLSID\{61738644-F196-11D0-9953-00C04FD919C1}
    4. HKLM\SOFTWARE\Classes\Wow6432Node\CLSID\{61738644-F196-11D0-9953-00C04FD919C1}
    5. HKLM\SOFTWARE\Wow6432Node\Classes\CLSID\{61738644-F196-11D0-9953-00C04FD919C1}
  11. For each key, perform the following procedure:
    1. Right-click on the key, and then choose Permissions.  The Permissions for {61738... dialog will appear:
    2. Verify that the desired access account or security group (as discussed in Step 1) is listed.  If it is not, add it.  For example, for this posting, the desired access security group is the local machine administrators group, spdev12\Administrators.
    3. Grant this account Full Control.
    4. If you are not able to change its permissions, click the Advanced button to open the Advanced Security Settings for {61738... dialog.  Select the Owner tab, and then take ownership of the registry key:
      Then repeat step 3.
  12. Exit RegEdit.
  13. Stop and restart IIS Admin Service.
  14. Open the Component Services console, and then expand the console tree to find the IIS WAMREG admin Service component.
  15. Right-click on this component, and then Properties.  The IIS WAMREG admin Service Properties dialog appears:.
  16. Select the Security tab,
    and then click the Edit button in the Launch and Activation Permissions group.  The Launch and Activation Permissions dialog appears:
  17. Add the account referred to by the error message, and grant it both Local launch and LocalActivation permissions:
  18. Click OK.  The Launch and Activation Permissions dialog closes.
  19. Click OK again. The WAMREG admin Service Properties dialog closes.
  20. Close the Component Services console.
  21. Stop and restart IIS.
References
Notes
  • Step 1: It doesn't matter what type of account it is, only that it is important to use the same account for all modifications that you are about to make.
  • Step 8: HKCR - HKEY_CLASSES_ROOT, HKLM - HKEY_LOCAL_MACHINE.
  • Step 10: these are the paths to the keys, but you can also find them just as easily by searching for IIS WAMREG admin.
  • Step 10: I found that it seemed that I only needed to modify the permissions for the first three keys and the others were modified automatically.
  • Acknowledgements: Thanks to Wictor Wilen's  article  for originally guiding me down the solution path, and to his article commenters Blair and Angus, who alerted me to the possibility that there may be more than one registry key involved.  In fact, for my instance, I found more keys involved than were identified in the article or by the commenters, and I had to modify permissions for the first three of the keys listed above.

    PowerShell script snippets for common SharePoint 2010 operations

    $
    0
    0
    Introduction

    Below are PowerShell script snippets that are frequently used and frequently forgotten.  To help lower blood pressure, associated with increasing old-age memory loss, these have been compiled here for convenient access.  This listing is dynamic and is updated as needed.

    Get a site list
    $sourceWebURL = http://spdev12/northwind
    $sourceListName = "Products"
    $SourceWeb = Get-SPWeb $sourceWebURL
    $SourceList = $SourceWeb.Lists[$sourceListName]
    Count the rows in a list freshly retrieved from a site
    $sourceWebURL = http://spdev12/northwind
    $sourceListName = "Products"
    $SourceWeb = Get-SPWeb $sourceWebURL
    $SourceList = $SourceWeb.Lists[$sourceListName]
    $Count = $SourceList.Count
    Get a site list then filter it based upon a column value
    $sourceWebURL = http://spdev12/northwind
    $sourceListName = "Products"
    $SourceWeb = Get-SPWeb $sourceWebURL
    $SourceList = $SourceWeb.Lists[$sourceListName]
    $SourceItems = $SourceList.Items | Where {$_['Category'] -Like '*Beverages*'}
    Count the rows in a site list that has been filtered by some column value
    $sourceWebURL = http://spdev12/northwind
    $sourceListName = "Products"
    $SourceWeb = Get-SPWeb $sourceWebURL
    $SourceList = $SourceWeb.Lists[$sourceListName]
    $SourceItems = $SourceList.Items | Where {$_['Category'] -Like '*Beverages*'}
    $SourceItems.Items.Count
    List the fields in a list
    $SourceWeb = Get-SPWeb http://spdev12/northwind
    $Sourcelist = $SourceWeb .Lists["mylist"]
    $Sourcelist.Fields | sort Title | FT Title,StaticName,ID -AutoSize
    Iterate through all items (rows) in a list
    $sourceListName = "Products"
    $SourceWeb = Get-SPWeb $sourceWebURL
    $SourceList = $SourceWeb.Lists[$sourceListName]
    $SourceItems = $SourceList.Items
    $SourceItems | ForEach-Object {
         Write-Host $_['ID']
         Write-Host $_['Title']
    }
    Get an item in a list by its ID value
    $SourceItems = $SourceList.GetItemById("1")
    or
    $SourceItems = $SourceList.Items | where {$_['ID'] -eq 1}
    Cast a variable as a string
    $var = 1,000
    [string]$MyString = $var.ToString()
    List the Properties and Methods of a Command or Object
    [Object] | Get-Member
    Iterate through each item in a site list and revise it
    $sourceListName = "Products"
    $SourceWeb = Get-SPWeb $sourceWebURL
    $SourceList = $SourceWeb.Lists[$sourceListName]
    $SourceItems = $SourceList.items
    foreach($item in $SourceItems)
    {
    if($item["Title"] -eq "My first item!")
    {
    $item["Title"] = "My first edited item!"
    $item.Update()
    }
    }
    Extract list A totals by category and then store these totals in list B

    $SiteURL = "http://spdev12/northwind"
    $ListName = "Products"
    $Site = Get-SPWeb $SiteURL
    $SiteList = $Site.Lists[$ListName]

    $TotalValueBeverages = 0
    $TotalValueCondiments = 0
    $TotalValueConfections = 0
    $TotalValueDairyProducts = 0
    $TotalValueGrainsCereals = 0
    $TotalValueMeatPoultry = 0
    $TotalValueProduce = 0
    $TotalValueSeafood = 0
    $BadResult = $FALSE
    [int]$Count = 0
    $SiteList.Items | ForEach-Object {
    $Count = $Count + 1
    if ($_['Category'] -Like '*Beverages*')
    {
    $TotalValueBeverages = $TotalValueBeverages + $_['UnitsInStock'] * $_['UnitPrice']
    }
    elseif ($_['Category'] -Like '*Condiments*')
    {
    $TotalValueCondiments = $TotalValueCondiments + $_['UnitsInStock'] * $_['UnitPrice']
    }
    elseif ($_['Category'] -Like '*Confections*')
    {
    $TotalValueConfections = $TotalValueConfections + $_['UnitsInStock'] * $_['UnitPrice']
    }
    elseif ($_['Category'] -Like '*Dairy Products*')
    {
    $TotalValueDairyProducts = $TotalValueDairyProducts + $_['UnitsInStock'] * $_['UnitPrice']
    }
    elseif ($_['Category'] -Like '*Grains/Cereals*')
    {
    $TotalValueGrainsCereals = $TotalValueGrainsCereals + $_['UnitsInStock'] * $_['UnitPrice']
    }
    elseif ($_['Category'] -Like '*Meat/Poultry*')
    {
    $TotalValueMeatPoultry = $TotalValueMeatPoultry + $_['UnitsInStock'] * $_['UnitPrice']
    }
    elseif ($_['Category'] -Like '*Produce*')
    {
    $TotalValueProduce = $TotalValueProduce + $_['UnitsInStock'] * $_['UnitPrice']
    }
    elseif ($_['Category'] -Like '*Seafood*')
    {
    $TotalValueSeafood = $TotalValueSeafood + $_['UnitsInStock'] * $_['UnitPrice']
    }
    else
    {
    $BadResult = $TRUE
    }
    }
    #Some convenient error checking to the console...

    Write-Host ("TotalValueBeverages: " + $TotalValueBeverages.ToString())
    Write-Host ("TotalValueCondiments: " + $TotalValueCondiments.ToString())
    Write-Host ("TotalValueConfections: " + $TotalValueConfections.ToString())
    Write-Host ("TotalValueDairyProducts: " + $TotalValueDairyProducts.ToString())
    Write-Host ("TotalValueGrainsCereals: " + $TotalValueGrainsCereals.ToString())
    Write-Host ("TotalValueMeatPoultry: " + $TotalValueMeatPoultry.ToString())
    Write-Host ("TotalValueProduce: " + $TotalValueProduce.ToString())
    Write-Host ("TotalValueSeafood: " + $TotalValueSeafood.ToString())
    Write-Host ("BadResult: " + $BadResult.ToString())
    Write-Host ("Count: " + $Count.ToString())

    $SiteURL = "http://spdev12/northwind"
    $ListName = "TotalInvByCat"
    $Site = Get-SPWeb $SiteURL
    $SiteList = $Site.Lists[$ListName]

    $ListItem = $SiteList.Items | Where {$_['Category'] -Like "*Beverages*"}
    $ListItem["TotalInvValue"] = $TotalValueBeverages
    $ListItem.Update()

    $ListItem = $SiteList.Items | Where {$_['Category'] -Like "*Condiments*"}
    $ListItem["TotalInvValue"] = $TotalValueCondiments
    $ListItem.Update()

    $ListItem = $SiteList.Items | Where {$_['Category'] -Like "*Confections*"}
    $ListItem["TotalInvValue"] = $TotalValueConfections
    $ListItem.Update()

    $ListItem = $SiteList.Items | Where {$_['Category'] -Like "*Dairy Products*"}
    $ListItem["TotalInvValue"] = $TotalValueDairyProducts
    $ListItem.Update()

    $ListItem = $SiteList.Items | Where {$_['Category'] -Like "*Grains/Cereals*"}
    $ListItem["TotalInvValue"] = $TotalValueGrainsCereals
    $ListItem.Update()

    $ListItem = $SiteList.Items | Where {$_['Category'] -Like "*Meat/Poultry*"}
    $ListItem["TotalInvValue"] = $TotalValueMeatPoultry
    $ListItem.Update()

    $ListItem = $SiteList.Items | Where {$_['Category'] -Like "*Produce*"}
    $ListItem["TotalInvValue"] = $TotalValueProduce
    $ListItem.Update()

    $ListItem = $SiteList.Items | Where {$_['Category'] -Like "*Seafood*"}
    $ListItem["TotalInvValue"] = $TotalValueSeafood
    $ListItem.Update()

    References

    How to recover a specific site from an unattached content database backup

    $
    0
    0
    Introduction

    This posting walks through the process of recovering a specific site from an unattached database backup, step-by-step.  This procedure is performed on a SharePoint Server 2010 farm.  The operating systems for all servers is Windows Server 2008 R2, and the farm data tier is hosted on SQL Server 2008 R2. This procedure employs the following tools: SQL Server Management Studio, SharePoint 2010 Central Administration and PowerShell 2.0.

    Step 1: Restore the content database to the SQL Server instance
    1. Copy the content database backup file to the SQL Server host machine:
    2. Launch SQL Server Management Studio:
    3. Expand the console tree to display the Databases folder.
    4. Right-click on the Databases folder.  A popup menu appears:
    5. Select Restore Database from this menu.  The Restore Database dialog appears:
    6. In the Destination for restore section of this dialog, in the To database, field, enter a name that you want to give the restored database.  For this procedure, Demo was entered.
    7. In the Source for restore section, select From device, and then click the ellipsis button.  The Specify Backup dialog appears:
    8. Click the Add button.  The Locate Backup File dialog appears:
    9. Expand the tree to find the content database, and then select it.
    10. Click OK.  The Locate Backup File dialog closes, the focus is returned to the Specify Backup dialog, the selected backup file now being listed:
    11. Click OK.  The Specify Backup dialog closes, and the focus returns to the Restore Database dialog, with the database listed:
    12. Click OK.  A progress indicator appears momentarily, and then the dialog closes.  The newly restored database now appears in the Databases folder:
    13. This completes restoration of the content database.
    Step 2: Export the site from the content database backup
    1. Launch Central Administration.
    2. In the Central Administration Quick Launch, click Backup and Restore.  The browser is navigated to the Backup and Restore administration page:
    3. In the Granular Backup section, click Recover data from an unattached content database.  The browser is navigated to the Unattached Content Database Data Recovery page:
    4. On this page, the Database Server name should already be entered.  Enter the Database Name.  This should be the same name that appeared in the Databases folder, after successfully completing the restore process.
    5. In the Operation to Perform section, select Browse Content, and then click Next.  The browser is navigated to the Browse content page:
    6. In the Site Collection section, select the appropriate site collection and site from the dropdowns:.
    7. In the Operation to Perform section, select Export site or list:
    8. Click Next.  The browser is navigated to the Site Or List Export page:
    9. In the File location section, enter the desired path and filename:.
    10. Click Start Backup.  The browser will be navigated to the Granular Backup Job Status page:
    11. This page refreshes automatically after a few moments.  Once the backup file has been successfully created, this status will be displayed in the Site Collection Backup section.  This will create a file with ending CMP.
    12. Verify that the site backup was created:
    13. This completes export of the site from the content database backup.
    Step 3: Create a new blank website
    1. Open a browser, and then navigate to the web application to which site backup will be restored.
    2. Navigate to the root site collection or subsite to which the site backup will be restored.
    3. From the Site Actions dropdown, select New Site.  The Create popup dialog appears, filtered to display new site templates available:
    4. Select the Blank Site template.  Then, in the configuration panel at right, enter a name for the new site and the name for the site that will become its URL:
    5. Click Create.  A progress indicator appears momentarily, and then closes.  The browser is then navigated to the new site:
    6. This completes creation of a new blank site.
    Step 4: Import the site
    1. Logon to the machine hosting the farm Central Administration application.
    2. Launch the SharePoint 2010 Management Shell.
    3. Test the import by running the import using the WhatIf condition:
      Import-SPWeb -Identity http://spdev12/jVectorMap -Path C:\jvectormap.cmp  -Force -Verbose -WhatIf
    4. Run the import script using the Verbose condition.  Doing so will display any minor warnings or errors generated during the import:
      Import-SPWeb -Identity http://spdev12/jVectorMap -Path C:\jvectormap.cmp  -Force -Verbose
    5. Otherwise, some errors may be missed:
    6. Checking the import log file revealed a minor error importing one of the files - a file that is prohibited from being uploaded by default policy:
    7. Open a browser, and then navigate to the new site.  The contents of the new site should now appear:
    8. This completes this procedure.
    Summary

    This posting has presented a step-by-step walkthrough for how to restore a specific site from an unattached content database backup.

    References
    Notes
    • "Unattached" in this instance means that the database is not attached to the farm.  It has nothing to do with whether it is attached to the SQL Server instance.

    How to enable document conversion from Word to HTML in SharePoint 2010

    $
    0
    0
    Introduction

    BI Services Series 
    How to implement SharePoint 2010 Access Services
    How to setup Secure Store and BCS to access LOB data
    How to enable document conversion from Word to HTML in SharePoint 2010
    How to set up Excel Services to use Secure Store Services and an unattended service account
    This posting walks through the process of enabling document conversion from Word to HTML using Word Automation Services.  The procedure developed for this posting was performed on the following farm topology: two-tier SharePoint 2010 farm, hosted on Windows Server 2008 R2 and employing SQL Server 2008 R2 for the database tier.  Domain controller, DNS, SQL Server instances collocated on same server.  NTLM authentication. All servers hosted within VMware Workstation 7.X.  All references used to guide development of this posting are provided in the References section.

    Step 1: Configure
    1. Launch Central Administration under an account that is a member of the Farm Administrators SharePoint group.
    2. Go: Central Administration > Service Applications > Manage services on server.  The browser is navigated to the Services on Server page:
    3. Look for the following two services:
    • Document Conversions Launcher Service.
    • Document Conversions Load Balancer Service.
    If you used the Farm Configuration Wizard, after initial installation, these will most likely already be created.  However, by default, they will be stopped.
  • Click the Document Conversions Load Balancer Servicefirst.  The browser is navigated to the Load Balancer Service Settings page:
  • Configure as desired, and then click OK.  The browser is navigated back to the Services on Server page.  If this service is not started, start it.  The Load Balancer service must be configured and started before configuring and starting the Launcher service, as the Launcher service depends upon the Load Balancer settings.
  • Click the Document Conversions Launcher Service second. The browser is navigated to the Launcher Service Settings page:
  • Configure as desired.  Note that the available servers listed in the Load Balancer server dropdown depends on properly configuring and starting the Load Balancer Service.
  • Click OK. The browser is navigated back to the Services on Server page.
  • Start the Document Conversions Launcher Service.  Both services will now appear as stated in the Services on Server page:
  • This completes Step 1.
  • Step 2: Enable
    1. Go: Central Administration > General Application Settings > External Service Connections > Configure document conversions.  The browser is navigated to the Configure Document Conversions page:
    2. In the Web Application section, select the web application from the dropdown list.
    3. In the Enable Document Conversions section, select Yes.
    4. In the Load Balancer Server section, select the Load Balance Server.
    5. In the Conversion Schedule section, select the desired schedule.  At this point, the page looks like this:
    6. In the Converter Settings section, click Customize From Word Document to Web Page (docx to html).  The browser is navigated to the Document Converter Settings page:.
    7. In the Converter Settings section, ensure that Make this document converter... has been checked, and edit other settings as desired:
    8. Click OK.  The browser is navigated back to the Configure Document Conversions page.
    9. Exit Central Administration.
    10. This completes Step 2.
    Step 3: Activate
    1. Connect to the web application identified in step 2.2, above.
    2. Go: Site Actions > Site Settings > Site Collection Administration > Site collection features.  The browser is navigated to the Features page.
    3. Scroll down to near the bottom, where you'll find the SharePoint Server PublishingInfrastructure feature:
      By default, this feature is not activated.
    4. Click the Activate button next to this feature.  After a few moments, the button will change to state Deactivate and a blue status message will appear next to it, indicating Activated.
    5. Now go: Site Actions > Site Settings > Site Actions > Manage site features.  The browser is navigated to the site settings Features page.
    6. Scroll down until you find the SharePoint Server Publishing feature:
    7. Click the Activate button next to this feature.  After a few moments, the button will change to state Deactivate and a blue status message will appear next to it, indicating Activated.
    8. This completes Step 3.
    Step 4: Test
    1. Upload a Word document to a document library in some web application site.  It doesn't matter which, as Word Automation services are set for the Web Application level and not at the site collection level.  For example, the Word document here was loaded to the default Shared Documents folder:
    2. Open the file's context menu, point to Convert Document, and then point to From Word Document to Web Page:
    3. Click this menu option.  The browser is then navigated to the Create Page From Document page.
    4. In the Page Title and Description section, enter a Title and a description. As the title is entered, it will be used to create an initial URL Name.  This name can be changed independently of the Title.  For this example, an underscore was used in place of a blank to avoid HTML encoding:
    5. Click Create.  A busy indicator will appear momentarily.  After a few moments, the browser is navigated to the new page, displaying the word document in HTML format:
    6. This page was created by default in the Pages library, which is created when you activate the Publishing feature:
       
    7. This completes testing.
    Optional: Remove the new page link from Global and Current Navigation
    1. To remove the newly converted Word document's link from Global and Current navigation, go: Site Actions > Site Settings > Look and Feel > Navigation.  The browser is navigated to the Navigation Settings page.
    2. In the Global Navigation and Current Navigation sections, uncheck the Show pages checkbox setting:
    3. Click OK.  The browser is navigated back to the Site Settings page, with the new page links no longer appearing:
    4. This completes this optional step.
    Summary

    This posting has presented the steps for how to enable document conversion from Word to HTML in SharePoint 2010.  For additional detail on the topics discussed in this posting, see the references below.

    References
    Troubleshooting
    • Convert Document option does not appear on the Word document's context menu:
    1. Go: Central Administration > General Application Settings > External Service Connections > Configure document conversions.  The Configure Document Conversion page is displayed.
    2. Verify the following settings:
    • Enable Document Conversions: Yes.
    • Load Balancer Server: [set to a valid load server and not to None]

    How to implement flyout menus in the SharePoint 2010 global navigation

    $
    0
    0
    Introduction

    This posting walks through the process of implementing flyout menus in the SharePoint 2010 global navigation.  It integrates the discussions presented in other postings on this subject (see discussions in the references below).  This process involves five critical steps:
    1. Modify MasterPage TopNavigationMenuV4 and TopNavigationDataSource controls
    2. Activate Publishing Infrastructure feature
    3. Build web application site topology
    4. Activate site SharePoint Server Publishing feature
    5. Configure global navigation
    Each of these steps is critical to fully implementing flyout menus.  Failure to implement any step will result in an inconsistent or even complete lack of user experience. Each of these steps and details will be presented here. All references used in helping develop this posting are listed in the References section, below.  This posting assumes a web application having a single site collection.  Successful completion of this procedure will require Administrative rights to the root site and to all subsites; and it will require SharePoint Designer permissions to the root site.

    Step 1: Modify MasterPage
    1. Launch SharePoint Designer 2010.
    2. Connect to the root site on the target web application.
    3. On the Navigation panel, at left, select Master Pages.  The Results panel at right updates to display a list of all Master pages for the site collection.
    4. Select the default master page, v4.master, and then make a copy of this, giving it a unique name.  For this posting, the copy is named v4_copy.master.
    5. Select this copy, and then click the Check Out button on the Master Pages ribbon, above.  A check appears next to v4_copy.master:
    6. On the Master Pages ribbon, click the Edit File button.  The Results panel is updated to display the file contents.
    7. On the View tabs, at bottom, click the Code view tab.  The Results panel is updated to display the page markup.
    8. In Code view, search for TopNavigationMenuV4.  This is the ID for the SharePoint ASP.NET global navigation control.  By default, it will look like so:
      <SharePoint: AspMenu
        ID="TopNavigationMenuV4"
        Runat="server"
        EnableViewState="false"
        DataSourceID="topSiteMap"
        AccessKey="<%$Resources:wss,navigation_accesskey%>"
        UseSimpleRendering="true"
        UseSeparateCss="false"
        Orientation="Horizontal"
        StaticDisplayLevels="2"
        MaximumDynamicDisplayLevels="1"
        SkipLinkText=""
        CssClass="s4-tn"/>
    9. Edit the following parameters of this control to a value that will encompass all of your subsites and sub-subsites:
    • MaximumDynamicDisplayLevels: 5.
  • After modifying this parameter, the control markup will look like this (highlighted item is modified):
    <SharePoint: AspMenu
      ID="TopNavigationMenuV4"
      Runat="server"
      EnableViewState="false"
      DataSourceID="topSiteMap"
      AccessKey="<%$Resources:wss,navigation_accesskey%>"
      UseSimpleRendering="true"
      UseSeparateCss="false"
      Orientation="Horizontal"
      StaticDisplayLevels="2"
      MaximumDynamicDisplayLevels="5"
      SkipLinkText=""
      CssClass="s4-tn"/>
  • In Code view, perform a search for TopNavigationDataSource.  This is the ID for the delegate control that defines the region for the global navigation bar.  By default, it looks like this (highlighted items are edited):
    <SharePoint: DelegateControl runat="server" ControlId="TopNavigationDataSource" Id="topNavigationDelegate">
        <Template_Controls>
            <asp:SiteMapDataSource
              ShowStartingNode="False"
              SiteMapProvider="SPNavigationProvider"
              id="topSiteMap"
              runat="server"
              StartingNodeUrl="sid:1002"/>
        </Template_Controls>
    </SharePoint: DelegateControl>
  • Edit the following parameters of this control, like so:
    • ShowStartingNode="True"
    • SiteMapProvider="SPSiteMapProvider"
  • Then completely remove this parameter:
    • StartingNodeUrl="sid:1002
  • After making these modifications, the TopNavigationDataSource configuration will look like so:
    <SharePoint: DelegateControl runat="server" ControlId="TopNavigationDataSource" Id="topNavigationDelegate">
        <Template_Controls>
            <asp:SiteMapDataSource
              ShowStartingNode="True"
              SiteMapProvider="SPSiteMapProvider"
              id="topSiteMap"
              runat="server"
              />
        </Template_Controls>
    </SharePoint: DelegateControl>
  • Save the file.
  • Close Code view.
  • Check the master page back in.
  • Close SharePoint Designer 2010.
  • Step 2: Activate SharePoint Server Publishing Infrastructure
    1. Launch a browser and connect to the root site of the web application for which you want to implement flyout menus.
    2. Go: Site Actions > Site Settings > Site Collection Administration > Site collection features.  The browser is navigated to the Features page.
    3. Scroll down this page until you find the SharePoint Server Publishing Infrastructure feature.  By default, after building the farm, this feature will be deactivated.
    4. Click the Activate button for this feature:
    5. Close the browser or tab connected to Central Administration.
    6. This completes this step.
    Step 3: Build site topology
    • In the target web application, build out the desired topology of sites, subsites, and sub-subsites.
    Step 4: Activate site SharePoint Server Publishing feature
    1. Navigate to the root site.
    2. Go: Site Actions > Site Settings > Site Actions > Manage site features.  The browser is navigated to the site Features page.
    3. Scroll down to the SharePoint Server Publishing feature.  This feature becomes available, once SharePoint Server Publishing Infrastructure has been activated for the web application.
    4. Click the Activate button for this feature:
    5. Repeat steps 3.2 through 3.4 for each site and subsite that you want to include in the flyout menu system.
    6. This completes this step.
    Step 5: Configure global navigation
    1. Navigate to the root site.
    2. Go: Site Actions > Site Settings > Look and Feel > Navigation.  The browser is navigated to the Navigation Settings page.
    3. In the Global Navigation section, enable the Show subsites option:
    4. This is the only configuration change that needs to be done.  Click OK.  The browser is navigated back to the Site Settings page.
    5. Repeat steps 5.2 - 5.4 for each site and subsite that needs to be included in the flyout menu system.  Once completed, all of the sites and subsites will appear in the appropriate flyout menu:
    6. This completes this step.
    Optional: Add web pages (instead of sites) to the flyout menu
    1. Documents that are converted, as, for example, converting a Word document to HTML, using Word Automation Services, will be stored in the Pages folder of the site in which the conversion was performed.  These pages are automatically added to the flyout menu system. Additionally, files that you add to the Pages folder will also appear in the flyout menu system. 
    2. For example, in the screen capture below, the flyout menu option Website-Upgrade-Plan-1B2B is a file automatically converted to HTML and then published using Word Automation Services.  The second item (shaded) is merely an ASPX page uploaded to the same Pages folder:
    Summary

    This posting has presented a step-by-step walkthrough for how to implement flyout menus in the SharePoint 2010 global navigation.  It involves a series of five critical steps, each of which must be completed for the flyout menu experience to be consistent or to display at all.  This posting integrates the postings of previous bloggers on this subject who have discussed individual aspects of this process.

    References
    Notes
    • The ASP.NET TopNavigationMenuV4 control StaticDisplayLevels parameters sets the maximum level of the sites that will be dynamically displayed on the global navigation bar.  By default, this is set to 2, which means that by default, the global navigation will display a link to the root site of the site collection and all subsites to the site collection root.  Setting this to 1 will cause global navigation to only display a link to the root site collection.
    • Adding items to the Pages folder: note that items added to this folder will automatically appear in the flyout menus.  However, only ASPX pages, from my experience, open in the browser as web pages.  I haven't yet figured out why this is so.
    • New site or page does not appear in flyout menu: if you experience this, check the following:
    1. Verify that the SharePoint Server Publishing feature has been activated for this site.  This is very likely the root cause, if the site does appear on the flyout menu from the root site, but not at the target site - or it appears at other sites.
    2. Sometimes, newly created sites do not appear on the flyout menu, for reasons unknown - perhaps latency?  In any case, I have found that going to the root site, unchecking the Show subsites option, clicking OK, returning to the page, checking it again, and then clicking OK again, seems to resolve the problem.
  • Deleted site or page continues to appear in flyout menu: if you experience this, I have found that procedure 2, immediately above, to be useful to clear the flyout menu of the deleted site or page link.  It seems to cause SharePoint Server 2010 to rebuild the flyout menu system fresh.
  • Publishing an Excel workbook to a SharePoint 2010 farm, from start to finish

    $
    0
    0
    Introduction

    This posting demonstrates, from start to finish, the process of:
    1. Creating an Excel workbook that connects to external data using Windows authentication;
    2. Modifying the external data connection to focus on specific data;
    3. Configuring the PivotTable;
    4. Configuring a PivotChart; and
    5. Publishing the workbook to SharePoint Server 2010 Excel Services.
    The target web application used in this demonstration hosts a single site collection.  By working through all of the steps of this posting, you will gain experience in configuring an Excel 2010 workbook to connect to external data and then publish this workbook to SharePoint Server 2010 Excel Services.  This posting assumes that the Excel Services application has already been started.  This posting integrates the discussions presented in many of the references listed below.

    Preparation
    1. Add a blank site to the target web application, naming it AdventureWorks:
    2. Configure the site to inherit global navigation from the parent:
    3. Add a document library to this site, naming it Workbooks:
    4. Restore the database, AdventureWorks2008R2Full Database Backup to a SQL Server instance hosted within the same domain as the SharePoint Server 2010 farm:
    Step 1: Create an Excel workbook and connect it to external data
    1. Launch Excel 2010 on a workstation hosted within the same domain as the target SharePoint Server 2010 farm, naming the new workbook SalesOrderHeader.
    2. On the Data ribbon, go: Go External Data > From Other Sources > From Data Connection Wizard:
      This opens the Data Connection Wizard.
    3. Select Microsoft SQL Server:
    4. Click Next.  Enter the name of the SQL Server Database instance hosting the AdventureWorks database, and then select Windows Authentication:
    5. Click Next.  From the dropdown, select the table, SalesOrderHeader:
      It's located towards the bottom of this listing.  This listing cannot be sorted.
    6. Click Next.  Enter values for File Name, Friendly Name and Search Keywords; and leave the checkbox unchecked:
      Leaving the checkbox unchecked causes the data connection to be embedded in the Excel file itself.  Checking this option causes the connection data to be stored in and used from an external data connection (odc) file.
    7. Click the Authentication Settings button.  Ensure that Windows Authentication has been selected:
    8. Click OK.  The Excel Services Authentication Settings dialog closes.
    9. Click Finish.  The Data Connection Wizard dialog closes, the Import Data dialog appears:
    10. Select PivotTable Report.  Only pivot tables can be refreshed on the SharePoint Server, once published and viewed by a user.
    11. Click OK.  The Import Data dialog closes, and the spreadsheet is populated with the data from the AdventureWorks table:
    12. This completes this step
    Step 2: Modify the workbook's external data connection
    1. On the Data ribbon, look for the Connections button:
    2. Click Connections. The Workbook Connections dialog appears:
    3. Click the Properties button.  The Connection Properties dialog appears:
    4. Select the Definition tab.
    5. From the Command type dropdown, select SQL.
    6. In the Command text box, delete the contents, and replace with the following:
      The Definition tab will then look like this:
    7. Click the Authentication Settings button.  The Excel Services Authentication Settings dialog appears.
    8. Select Windows Authentication:
    9. Click OK.  The Excel Services Authentication Settings dialog closes.
    10. Click where it states, Click here to see where the selected connections are used.  This updates what is displayed in the bottom panel with the workbook location of the data obtained from the external data connection:
    11. Click Close.  The Excel workbook sheet pivot table updates and now displays fewer fields in the PivotTable Field List panel:
    12. This completes this step 2.
    Step 3: Configure a PivotTable
    1. Drag-and-drop the fields, in the Pivot Field List, as shown:
    2. On the Design ribbon, click Report Layouts and then point to Show in Tabular Form:
    3. Click this option.  The pivot table updates to display the data in tabular form:
    4. On the Options ribbon, in the Show section, click the +/-button.  The pivot table updates and no longer displays the show/hide (+/-) button.
    5. On the Design ribbon, click Report Layout, and then select Repeat All Item Labels. The spreadsheet updates to repeat the labels shown in the CountryCode column.
    6. On the Design ribbon, click Subtotals, and then point to Do Not Show Subtotals:
    7. Select this option.  The pivot table updates and no longer shows subtotals:
    8. At the top of the column to the immediate right of the Sum of TotalSales column, enter the column header SelectedCurrencyValue:
    9. Click once anywhere in the columns at left, to bring back the Pivotable Field List panel, and then click the small dropdown on the OrderDate button, which brings up a popup menu:
    10. Select Move Up.  The PivotTable updates to now display the OrderDate column first:
    11. In the field just below the new SelectedCurrencyValue header, enter the following:
      =GETPIVOTDATA("TotalSales", $A$1, "OrderDate", A2, "Territory", C2, "CountryCode", B2)*ExchangeRate
    12. The order of the field names in this function is critical.  They must be exactly in the same order as the columns in the PivotTable.
    13. Press Enter.  The cell updates to display the function value:
    14. Scroll down to the bottom of the PivotTable and note down the row number for the last row of data.  For this posting, the row number is: 5832.  Then scroll back to the top.
    15. In the Name field, enter E2:E5832.  This causes the enter column to be selected (except for the header).
    16. Press CTRL+D.  This causes the function in E2 to be repeated for all of the other cells in this column:
    17. In the Name field, enter A1:E5832, and then press Enter.  This causes all of the data rows and the header row to be selected:
    18. In the Name field, overwrite any value there with the value SourceDataTable, and then press Enter.  This assigns a name to all that was selected, effectively creating a source of data:
    19. Select Sheet2.
    20. In cells A1 and B1 enter these values:
      1. Exchange Rate.
      2. 1.
    21. Select cell A2, and then in the Name field (currently displaying A2), overwrite this with ExchangeRate:
      This assigns that cell a variable name.
    22. In cell A2 and B2, enter these values:
      1. Currency Code.
      2. USD.
    23. Select cell B2, and then in the Name field (currently displaying B2), overwrite this with CurrencyCode:
    24. In cell A3 and C3, enter these values:
      1. Chart Title.
      2. ="Sales in "& CurrencyCode.
    25. Select cell C3, and then in the Name field (currently display C3), overwrite this with ChartTitle:
    26. To review all of the cell and table variables that have been created thus far, on the Formulas ribbon, in the Defined Names section, click Name Manager.  The Name Manager dialog appears:
    27. This completes Step 3.
    Step 4: Configure a PivotChart
    1. Select Sheet3.
    2. On the Insert ribbon, click PivotTable.  The Create PivotTable with PivotChart dialog appears:
    3. Enter the name for the source data table created previously, SourceDataTable, and then click OK.  The sheet update to display a blank PivotTable, PivotChart and PivotTable Field List panel:
    4. On the PivotTable Field List panel, drag fields into the Axis Fields, Legend Fields and Values boxes like so:
    5. Then move the chart and resize it so that it fills the viewable area:
    6. Select the chart.  This activates the PivotChart Tools ribbons.
    7. On the Layout ribbon, click Chart Title, and then point to Above Chart:
    8. Click this option.  A title field is added to the chart, displaying a default value:
    9. Select the chart title field, and then enter the following into the Formula bar:
      =SalesOrderHeader.xlsx!ChartTitle
    10. Select the chart to activate the Chart ribbons.
    11. On the Design ribbon, click the Change Chart Type button.  The Change Chart Type dialog appears:
    12. Hover the cursor over the various images displayed in this dialog to view the names of the different chart types.
    13. Select the Stack Chart type, and then click OK.  There will appear to be little noticeable difference in the chart, but this is due to the amount of data currently displayed by the chart, which tends to obscure such things.
    14. On the Design ribbon, in the Chart Styles section, expand the chart styles panel and then point to Style 16:
    15. Click on Style 16.  Again, there will be little noticeable change in the chart currently displayed.  However, this change will become apparent, when zooming into date ranges using the filter options.  Additionally, these chart options must be set now before publishing to the SharePoint Server instance, as, once published, they cannot be changed from the web interface.
    16. This completes Step 4.
    Step 5: Publish the workbook to SharePoint Server 2010 Excel Services
    1. On the Excel UI, select the File tab, at far left.
    2. On the File tab, go: Save & Send> Save to SharePoint:
    3. Double-click Browse for a location. The Save As panel appears.
    4. In the File Name field, enter the path to the document library created in step 1:
    5. Press Enter.  After a few moments, the Save As dialog updates to display the SharePoint Server 2010 document library location.
    6. Enter the name of the Excel 2010 workbook, SalesOrderHeader:
    7. Be sure to also check: Open with Excel in the browser.
    8. Press Enter. A progress bar appears momentarily.  Then a new browser instance is launched and connected to the web-enabled workbook displaying a warning message:
    9. Click Yes. After a few moments, the browser displays the web-enabled workbook:
    10. Click the Row Labels dropdown, point to Date Filters and then point to Between:.
    11. Click Between.  A Custom Filter dialog appears.
    12. Enter the between dates 7/3/2005 and 7/30/2005:
    13. Click OK. The chart updates to display a filtered date-range of values:
    14. Click the Column Labels dropdown, and then point to Filters:
    15. Click Filters.  The Filter dialog appears.
    16. Uncheck the CA and US items:
    17. Click OK.  The chart updates to display just the sales for GB, FR, DE and AU:
    18. This completes Step 5.
    Optional: Configure Session Timeout
    1. Launch Central Administration.
    2. Go: Central Administration > Application Management > Manage Service Applications > Excel Services Application > Trusted File Locations:
    3. Click on the http:// link listed there.  The Edit Trusted File Location page is displayed.
    4. Scroll down to the Session Management section.
    5. Change the Sessions Timeout and Short Session Timeout values to 20 minutes (1200 seconds):
    6. Click OK.
    Summary

    This posting has presented the step-by-step process for creating, configuring and publishing an Excel 2010 workbook to SharePoint's Excel Service in order to make it generally available to other users.  The external connection used by this workbook is embedded in the workbook itself.  By working through this posting, one gains experience in how to configure an Excel workbook to connect to external data and in how to publish a workbook to SharePoint.  For additional detail on any of the topics discussed in this posting, pleased consult the references below.

    References
    Notes
    • By default, Session Timeout is 450 seconds, or 7.5 minutes. Longer session times can be configured through the Excel Services Application.

    Missing Office Client Applications web part category

    $
    0
    0
    Problem

    You are attempting to implement the Excel Web Access (EWA) web part on a SharePoint Server 2010 page.  You activate the SharePoint Server Enterprise Site Collection features; you then activate SharePoint Server Enterprise Site features, for the specific site.  When you then set a page into Edit mode and attempting to insert the web part, the Office Client Applications category does not appear.  To resolve this, you even perform the Enable all sites in this installation to use the following set of features... action in Central Administration; and you perform manual installations of the PremiumSite feature using PowerShell or stsadm.  However, the Office Client Applications category still does not appear.  When you go to the Webparts gallery, this category does not appear either.

    Resolution

    The issue may not in fact be technical at all.  If you have performed all of the usual preparatory steps for making the Office Client Applications available, and the Office Client Applications category still doesn't appear, look under the Business Data web part category and you may find them there:

    References

    How to set up Excel Services to use Secure Store Services and an unattended service account

    $
    0
    0
    Introduction

    BI Services Series 
    How to implement SharePoint 2010 Access Services
    How to setup Secure Store and BCS to access LOB data
    How to enable document conversion from Word to HTML in SharePoint 2010
    How to set up Excel Services to use Secure Store Services and an unattended service account
    This posting walks through the process of configuring SharePoint Server 2010 farm Excel Services to use Secure Store Services and an unattached service account, when presented published Excel 2010 workbooks and workbook objects that connect to external data sources.  Accomplishing this involves the following tasks:
    1. Configuring a data access account;
    2. Configuring the farm Secure Store target application for the unattended service account;
    3. Configuring the farm's Excel Services Global Settings;
    4. Configuring a workbook to use the unattended service account when published and connecting to external data sources;
    5. Configuring this workbook to publish only user-defined workbook objects to Excel Services; and finally
    6. Testing our implementation.
    This posting assumes that you already have a workbook created and connected to an external data source; that you have already created a PivotTable; and that you have created a PivotChart in this workbook.  It also assumes that you have configured and started Excel Services on the farm.  This posting employs the AdventureWorks database to present Excel Services, and all development work was performed within an environment hosted on VMware Workstation 7.X.

    Preparation
    • Identify an Active Directory service account that will serve as the Excel services unattended service account.  This must be a domain account.  It may be an existing farm services account or a new one.
      • For this posting, an existing farm services account, contoso\sp_app, will be used.
    • Identify the target external data source to which Excel needs access.
      • For this posting, the full version of the AdventureWorks database, version 2008R2, will be used.
    • Identify a name that you will assign to the Secure Store service application.
    • Create or identify a document library on the farm to which you want to publish a workbook.
    Step 1: Configure the data access account
    1. Launch SQL Server Management Studio.
    2. In the console tree, expand Security.
    3. Right-click on Logins, and then click New Login.
    4. Add the AD account, in this case, contoso\sp_app, and then select Windows Authentication.
    5. Select the User Mapping page; select the target database (in this case AdventureWorks Full); and then add the db_datareader role to this account:
    6. Click OK.
    7. This completes Step 1.
    Step 2: Configure a new Secure Store target application
    1. Connect to Central Administration using a farm administrator account (this is critical).
    2. Go: Security > General Security > Configure service accounts.
    3. From the Credential Management dropdown, select Service Application Pool - SharePoint Web Services Default:
    4. Verify that Excel Services Application (Excel Services Application Web Service Application) is listed along with other service applications.
    5. Note down the account name associated with this service.  For this posting, the service account is: contoso\sp_app.
    6. Click Cancel.
    7. Go: Application Management > Manage service applications.  The Manage Service Applications page is displayed:
    8. Click on Secure Store Service.  The Secure Store Service page is displayed:
    9. On the Edit ribbon, click the New button.  The Create New Secure Store Target Application Target Application Settings page is displayed.
    10. Configure the new Secure Store Target Application.  For this posting, the following configuration was used:
      1. Target Application ID: ExcelServicesUnattended.
      2. Display Name: ExcelServicesUnattended.
      3. Contact Email: Stephan.bren@contoso.com.
      4. Target Application Type: Group:
      5. Click Next. The Create New Secure Store Target Application Add Field page is displayed:
      6. Leave all settings default, and then click Next.  The Create New Secure Store Target Application Specify the membership settings page is displayed.
      7. Enter user accounts who for administration and the unattended account that will be mapped to this secure store application:
      8. Click OK.  The browser is returned to the Secure Store Service Target Application page, now displaying the new Target Application name:
      9. Check the new target application item listed, and then, on the Edit ribbon, click the SetCredentials button.  The Set Credentials for Secure Store Target Application (Group) dialog appears.
      10. In this dialog, enter the same domain account and password that was used in Step 1:
        For this posting, these accounts are the same, but they need not be.
      11. Click OK.
    11. This completes Step 2.
    Step 3: Configure Excel Services Global Settings
    1. From Central Administration, go: Application Management > Manage Service Applications:
    2. Click Excel Services.
    3. Click Global Settings, and then scroll down to the External Data section.
    4. In the Application ID field, enter the same name that was assigned to the Target Application ID, back in step 2.  For this posting, the Target Application ID is ExcelServicesUnattended:
    5. Click OK.
    6. This completes Step 3.
    Step 4: Configure the workbook to use the unattended service account
    1. Open the Excel 2010 workbook that you want to publish and that is connected to an external data source:
    2. On the Data ribbon, click the Connections button.  The Workbook Connections dialog appears:
    3. Click the Properties button.  The Connection Properties dialog appears:
    4. Check off all of the options that you see, and then select the Definitions tab:
    • The Command Text and Command Type are custom.  For additional information on these, see the Notes section, below.  The SQL that you see there is the following:
  • Click the Authentication Settings button.  The Excel Services Authentication Settings dialog appears.
  • Select None:
  • Click OK.  The Excel Services Authentication Settings dialog closes.
  • Click OK again.  The Connection Properties dialog closes.
  • Click OK one more time.  The Workbook Connections dialog closes.
  • This completes this Step 4.
  • Step 5: Configure Workbook objects to be published
    1. Select the PivotChart that you want to be published.
    2. On the Layout ribbon, click the Properties button.  The small Chart Name box appears just below the button.
    3. Enter a defined name for this chart object.  For this posting, the defined name for the chart will be MyChart:
      Incidentally, this particular chart already has filters applied: the date range has between filtered to between 7/3/2005 and 7/30/2005. This filtering is not fixed and can be modified even after publication to the farm.  We'll see how later.
    4. Press the Enter key.  The little dialog closes, and now when you select the chart, the defined name for the chart will appear in the Name box.
    5. Select the File tab.  The File options are displayed.
    6. On the File tab, select the Save & Send option, and then select Save to SharePoint:
      .
    7. Click the Publish Options button.  The Publish Options dialog is displayed.
    8. On the Show tab, from the dropdown, select items in the Workbook; then check the MyChart and PivotTable2 objects listed below:
    9. Click OK.  The dialog closes.
    10. This completes Step 5. All configuration has now been completed and it remains to test the implementation.
    Step 6: Perform a test publication of the workbook
    1. Double-click where it states, Browse for a location.  A Save As dialog appears:.
    2. Enter the URL to the document library identified or created at the beginning of this posting.  For this posting, the URL is:
      http://spdev12/AdventureWorks/Workbooks/
    3. Press the Enter key.  After a few moments, the target SharePoint document library will be shown on the Save As dialog:
    4. Press the Enter key again.  The dialog closes.  After a few moments, a new browser instance is launched that displays the published workbook chart:
      Note that it displays the same filtered view that was previously configured in the local workbook copy itself.
    5. To change the filter and interact with the chart, look for the View dropdown, in the upper right corner, and then select PivotTable2 from this dropdown.  The view changes to display the PivotChart's data:
    6. Change the filter settings as desired, and then return to the PivotChart (in this case MyChart) object to see the affect:
    7. This completes Step 6.
    Optional: Display the PivotChart in a Dashboard
    1. Navigate to the target site dashboard page.
    2. On the Page ribbon, click the Edit Page button.  The page enters edit mode:
    3. Click where it states, Add a Web Part, in the web part zone to which you want to add the image.  The Browse ribbon gets the focus and displays tools for finding and selecting a web part.
    4. In the Categories panel, click Business Data, and then in the Web Parts panel, select Excel Web Access:
    5. Click the Add button.  The Browse button is updated, and the page body is updated to display the added web part in edit mode:
    6. Click the link, Click here to open the tool pane.  The Excel Web Access toolpane is displayed:
    7. Click the ellipsis box next to the Workbook field.  The Select an Asset -- Webpage Dialog appears:
    8. In this dialog, navigate to the location of the published workbook.  For this posting, the workbook is located in the Workbooks document library in the AdventureWorks site:
    9. Click OK.  A progress indicator appears for a few moments, and then the dialog closes, with the workbook path now displayed in the Workbook field on the Excel Web Access toolpane:
    10. Click OK.  The toolpane closes, and the PivotChart is now displayed in the web part:
    11. To expand the web part so as to eliminate the scroll bars, from the title toolbar, just above the web part, select the Edit Web Part option.  The Excel Web Access toolpane opens.
    12. Scroll down to the Appearance section, and expand this section.
      1. Select Yes for both the Height and Width fields;
      2. enter 475 for height and
      3. enter 580 for width; and then
      4. select None from the Chrome Type dropdown:
    13. Click OK, and then on the Page ribbon, click the Stop Editing button; then select the Browse tab.  The PivotTable is displayed as it would appear to any user:
    14. To remove the PivotChart toolbar (File, Data, Find, etc), go back to the Toolpane, and then select None from the Type of Toolbar dropdown in the Title  Bar section.  You might also want to uncheck All Workbook Interactivity in the Navigation and Interactivity section.  After making these changes, the PivotChart displays as a simple image:
    15. This completes the Optional step.
    Summary

    This posting has presented the steps necessary for how to setup SharePoint Server 2010 Excel Services to use Secure Store Services and the unattended service account when presenting Excel workbook objects, such as PivotCharts and tables.  For additional detail on any topic discussed here, see the references below.

    References
    Notes
    • Step 4: Excel Services Authentication Settings dialog: Selecting None here is essential.  By selecting None, Excel Services uses the unattended service account identity to establish the connection to the external data source.
    • Step 5: Publish Options dialog: Selecting specific items will impact the user's online experience when viewing the published workbook later on.  Selection of the appropriate objects here is important: if you want to only present the PivotChart, then only select the chart object and nothing else. If you want to publish the chart and also enable users to interact with the chart, you must select the chart object and the its data source, which in this case is the PivotTable2 object.  The reason being that published PivotCharts cannot be made directly interactive.  The way to work around this is to provide access to the underlying chart data, and the filter methods associated with that data.  We'll see this later once the workbook objects are published.
    • Optional: Select an Asset -- Webpage Dialog: note that you can navigate to any asset (workbook) within the site collection - not just to assets within the current site.

    How to create a no-code drill-down chart in SharePoint 2010

    $
    0
    0
    Introduction

    This posting walks you through the process of creating an out-of-the-box, no-code drill-down chart in SharePoint 2010.  It uses the Northwind sample database transformed to SharePoint 2010 for data, specifically the Products and Categories lists.  The Categories list is related to the Products list through a one-to-many relationship.  The process involves several discrete steps:
    1. Inserting the Chart web part onto the target page.
    2. Adding a count field to the Categories list that automatically counts the number of occurrences of a Category item in the Products list.
    3. Connecting the Chart web part to the Categories list.
    4. Configuring Chart drill-down capability.
    Step 1: Insert the Chart web part
    1. Launch SharePoint Designer 2010, and then connect to the target site.
    2. In Designer insert the Chart web part onto the target page.
    3. Next, in Code view, search for the ShowToolbar parameter, and then set this to False.  You will not need to go to Advanced Mode to make this change.
    4. Select the Chart web part inserted on the page, and then, on the Format ribbon, click Chrome Type, and then click None.
    5. Click the Chrome State button, and then click Normal.
    6. Save the file and then exit Designer.
    7. You should see something like the following:
    Step 2: Add count column to Categories list
    1. Launch a browser, and then connect to the target site.
    2. Navigate to the Categories list:
    3. Select the List ribbon.
    4. In the Manage Views group, click the Add Column button (to find it, hover the cursor over ribbon items to view a popup title of the item).  The Create Column modal dialog appears.
    5. Configure as follows:
      1. Column name: Count.
      2. Type of information: Lookup.
      3. Get information from: Products.
      4. In this column: Category (Count Related).
      5. Leave all other fields default:
    6. Click OK.  The Categories list now displays the number of times that each category was used in the Products table:
    Step 3: Connect Chart to Categories list
    1. Launch a browser and then connect to the target page.
    2. On the Page ribbon, click Edit Page.
    3. As you move the cursor over the chart web part, a dropdown will appear across from the web part title. Click the dropdown, and then point to Connect to Data:
    4. Click this menu item.
    5. Select Connect to a List.
    6. Click Next.
    7. Select the site where the Products list is hosted; select the Categories list.
    8. Click Next.
    9. Click Next.
    10. Expand the Series Properties area, and then configure as follows:
      1. Series Name: CategoryCounts.
      2. Series Type: Bar.
      3. Leave all other fields default:
    11. Click Finish.
    Step 4: Configure chart drill-down capability
    1. NOTE: after making each change below, press ENTER.  Changes can be made only one at a time, as each change triggers a page reload.
    2. Launch a browser and then connect to the target page.
    3. On the Page ribbon, click Edit Page.
    4. As you move the cursor over the chart web part, a dropdown will appear across from the web part title. Click the dropdown, and then point to Advanced Properties.:
    5. In the Select and Element tree at left, click Series.
    6. On the Chart Properties listing, scroll down to the MapArea group.
    7. Enter the following URL+keyword string:
      /Northwind2/Lists/Products/AllItems.aspx?FilterField1=Category&FilterValue1=#VALX
    8. Click Finish.
    9. Move the cursor over the bars to see the unique URL now configured for each:
      Clicking on any bar navigates the browser to the Products list, now filtered by the appropriate category value.  For example, clicking the Seafood bar in the chart, which has a value of 12, navigates the browser to the Products list, which lists 12 seafood items:
    Optional: Enhance Chart Appearance
    1. Launch a browser and then connect to the target page.
    2. On the Page ribbon, click Edit Page.
    3. As you move the cursor over the chart web part, a dropdown will appear across from the web part title. Click the dropdown, and then point to Advanced Properties.
    4. Change Chart Dimensions
      1. In the Chart Properties listing, scroll down to the Layout group, and change Width to 500px.
      2. Press Enter.  The change is then implemented:
        Be sure to press Enter after making each change.  Otherwise, you might lose some changes.
    5. Show Interlaced
      1. On the Select an Element tree, select Chart Areas.
      2. From the Axis Menu, select X axis.
      3. In the Chart Properties listing, in the Appearance group, configure as follows (press Enter each time):
        1. IsInterlaced: True.
        2. InterlacedColor: WhiteSmoke.
        3. The changes will be implemented immediately:
      4. Click Finish.
    6. Add Title
      1. On the Select an Element tree, select Titles.
      2. Click the small + sign just above the top right corner of the Chart Properties list.  This adds a new Title object to the chart, and the Chart Properties listing now displays configurable parameters for this object.
      3. In the Appearance group, scrolling down a bit, look for the Text parameter and then set the text to the desired title.
      4. Scroll just a bit back up, looking for the Size and Bold parameters, setting these to 12 and True respectively:
    7. Add Axis Labels
      1. On the Select an Element tree, select Chart Areas.
      2. From the Axis Menu, select X axis.
      3. Scroll down to the Title group.
      4. Set the Bold parameter to True.
      5. Enter the desired x-axis title into the Title parameter.
      6. From the Axis Menu, select Y axis.
      7. Scroll down to the Title group.
      8. Set the Bold parameter to True.
      9. Enter the desired y-axis title into the Title parameter.
      10. Now the chart has X and Y axis labels:
      11. Click Finish.
    8. Display each bar in different color
      1. On the Select an Element tree, select Series.
      2. On the Series Menu, select the desired series (if you have only one series, this will likely display as Default).
      3. On the Chart Properties listing, in the Appearance group, scroll down until you see the Palette property.  By default, this will be set to None.
      4. Select any other setting available from this dropdown.  The change will be immediate:
      5. Click Finish.
    9. The final interactive chart:
    Summary

    This posting as shown how to create a no-code drill-down chart in SharePoint 2010.  It has also shown a few ways in which to enhance the chart's appearance.  For additional details on the topics discussed in this posting, see the references below.

    References
    Notes
    • The URL defined in Step 4.7 does not include the view ID.  You see this ID when you choose to filter a list by some column value in the list.  You don't need this ID if you are referring to just one list, and this list is located on a different page, such as an application page.  However, if you are building page containing lists, and the charts are referring to those lists, you will need to use the view ID.  Otherwise you will experience this error: One or more field types are not installed properly. Go to the list settings page to delete these fields.

    Build querystring from form field data

    $
    0
    0
    Here's a simple way of getting form field data from a SharePoint form, adding that data to a URL, and then causing the browser to navigate to that URL.  It assumes a form named MyForm and a textbox element named TextBox1.  Additional parameters can be added as needed. This gets you started:

    function setMyFormURL()
    {
    var string = document.getElementById('Textbox1').value;
    var urlString = '~/sitepages/myFile.aspx?fn=' + string;
    document.location.href = urlString;
    }
    .
    .
    .
    OnClientClick='JavaScript:setMyFormURL();return false;'

    References

    SharePoint 2010: How to Customize Application Pages

    $
    0
    0
    Introduction

    This posting walks you through the process of customizing the AccessDenied application page using Visual Studio 2010, step-by-step.  The AccessDenied application appears when a user attempts to access a resource for which he or she does not have the necessary permissions:
    The approach used to customize this application page can also be used to modify the other customizable application pages, including:
    • Confirmation.aspx
    • Error.aspx
    • Login.aspx
    • ReqAcc.aspx
    • SignOut.aspx
    • WebDeleted.aspx
    The approach detailed her involves using Visual Studio 2010 to create and deploy a new feature.  Note that you can also accomplish modifying these pages using PowerShell.  You would need to first create the application page, modify it as desired, and then use PowerShell to set the webApp.UpdateMappedPage property.  More on this approach is provided in the References below.

    Step 1: Create a new SharePoint 2010 project
    1. Launch Visual Studio 2010
    2. On the Start page, click New Project. The New Project dialog appears.
    3. On the tree panel, at left, select Visual C#, the SharePoint, and then 2010.
    4. On the list pane, at center, select Empty SharePoint Project.
    5. In the Name field, below, enter a name.  For this project, the name will be CustomErrorPageFeature2:
    6. Click OK. The SharePoint Customization Wizard dialog appears.
    7. Enter the URL to the web application to which you want to deploy the new feature.
    8. Select Deploy as a farm solution.
    9. Click Finish.  The Visual Studio 2010 desktop appears.
    Step 2: Configure the project
    1. In Solution Explorer, at right, right-click on the project name, point to Add, and then point to SharePoint Layouts Mapped Folder:
    2. Click this selection. A Layouts folder and CustomErrorPageFeature2 subfolder are added to the project.
      The Layouts folder points to the virtual _layouts folder physically located here:
      C:\Program Files\Common Files\Microsoft Shared\Web Server Extensions\14\TEMPLATE\LAYOUTS
    3. In Solution Explorer, right-click on the project name, point to Add, and then point to SharePoint Images Mapped Folder.   The Images folder points to the virtual images folder that is physically located here: C:\Program Files\Common Files\Microsoft Shared\Web Server Extensions\14\TEMPLATE\IMAGES
    4. Click this selection.  An Images folder and CustomErrorPageFeature2 subfolder are added to the project. The project now presents two mapped folders, each pointing to physical folders in SharePoint:
    5. In Solution Explorer, right-click on Layouts/CustomErrorPageFeature2 subfolder, point to Add, and then point to New Item.
    6. Click this item.  The Add New Item dialog appears.
    7. On the left tree panel, select Visual C#, SharePoint, and 2010.
    8. On the center list panel, select Application Page.
    9. In the Name field, enter a name for the application page.  For this posting, the feature will be named CustomAccessDenied.aspx.
    10. Click Add.  The new application page is added and the page is opened in design view.
    11. Right-click on Layouts/CustomErrorPageFeature2 subfolder again, point to Add, and then point to Existing Item.
    12. Navigate to: C:\Program Files\Common Files\Microsoft Shared\Web Server Extensions\14\TEMPLATE\LAYOUTS, and then select AccessDenied.
    13. Click Add.
    14. Now, right-click on the Images/CustomErrorPageFeature2 subfolder, point to Add, and then point to Existing Item.
    15. Navigate to your image, and then select your image.
    16. Click Add.
    17. The project should now include two application pages in the Layouts folder and an image in the Images folder:
    Step 3: Prepare CustomAccessDenied.aspx
    1. If it is not already open, double-click on CustomAccessDenied.aspx.
    2. Select everything in this file (CTRL+A), and then remove it (CTRL+X).
    3. If it is not already open, double-click on AccessDenied.aspx.  It will appear in Design view.
    4. Select everything in this file (CTRL+A), and then copy (CTRL+C).
    5. Go to CustomAccessDenied.aspx.
    6. Paste into this file (CTRL+V).
    7. In Solution Explorer, select AccessDenied.aspx.
    8. Press the DEL key, and click OK at the warning prompt.
    9. Save the project.
    Step 4: Edit CustomAccessDenied.aspx
    1. Go to CustomAccessDenied.aspx and review its markup.  Look for the place holder tag, PlaceHolderPageTitleInTitleArea.  The Text property of this control determines what appears for the application title:
    2. For this place holder, edit the Text property by removing the in-line ASP code, and replacing with your desired text.  For this posting, the text will be replaced with: Oops! You don't have the appropriate permissions to access this resource!
    3. Look for the PlaceHolderPageTitle tag, and edit its Text property by replacing the in-line script with your desired text.  The Text property of this control determines what appears in the browser tab or title for this page:
    4. For this posting, edit the text to replace it with: Oops! Access Denied!
    5. Next, add the following script tag, editing the image file name to whatever you appropriate to your image:
      <asp:Content ID="Content6" ContentPlaceHolderId="PlaceHolderIcon" runat="server">
         <img   title="pgclogo" border="0" alt="PGC Logo" src="/_layouts/images/CustomErrorPageFeature2/Bee_Spring_2010.jpg"  height="41" width="50" />
      </asp:Content>
      This control determines the image that is displayed on the page:
    Step 5: Develop Feature Code
    1. In Solution Explorer, look for the Features folder.  Right-click this folder, and then point to Add Feature.
    2. Click this item.  The Feature1.feature tab appears:
    3. In Solution Explorer, look for the new feature you added.  It will appear in the Features folder.  By default it is named Feature1.  Right-click this item, and then point to Add Event Receiver.
    4. Click this item.  A new tab code view will appear, Feature1.EventReceiver.cs:
    5. In this code view, look for the FeatureActivated and FeatureDeactivating methods.  This will be commented out by default.
    6. Uncomment both of these methods.
    7. Add a using directive for the SharePoint.Administration namespace:
      using Microsoft.SharePoint.Administration
    8. Add the following code within the FeatureActivated method:
      using (SPSite site = new SPSite("http://spdev12"))
      {
      //Get a reference to the web application.
      SPWebApplication webApp = site.WebApplication;
      //Update AccessDenied application page to AxsDnd.aspx.
      webApp.UpdateMappedPage(SPWebApplication.SPCustomPage.AccessDenied,
          "/_layouts/CustomErrorPageFeature2/CustomAccessDenied.aspx");
      webApp.Update();
      }
    9. Add the following code within the FeatureDeactivating method:
      using (SPSite site = new SPSite("http://spdev12"))
      {
      //Get a reference to the web application.
      SPWebApplication webApp = site.WebApplication;
      //Reset the mapping to the default application page.
      webApp.UpdateMappedPage(SPWebApplication.SPCustomPage.AccessDenied, null);
      webApp.Update();
      }
    10. Next, update URL in the SPSite method to point to your site.  For this posting, the URL is updated to http://spdev12:
    Step 6: Build Project
    1. In Solution Explorer, right-click the project name, and then point to Build.
    2. Click this item.  After a few moments, the build process is completed, and any warnings and errors encountered during this process are listed in the Error panel.  You can ignore the warning associated with the PlaceHolderIcon control.
    Step 7: Deploy feature
    1. In Solution Explorer, right-click the project name, and then point to Deploy.
    2. Verify that the deploy process was completed successfully, by viewing the Output list.
    3. Open a browser, and then connect to Central Administration.
    4. In Central Administration, go: System Settings > Farm Management > Manage Farm Solutions.
    5. Verify that your new farm solution appears listed.
    6. Click on the farm solution, and then verify that it was already deployed.
    Step 8: Test
    1. Open a browser, and then connect to a page in the web application that only a site owner or administrator should be able to access, such as, for example, the Site Collection Administrators page.
    2. From the user menu, in the top right corner of the page, point to Sign in as Different User.
    3. Click this item.
    4. At the prompt, enter authentication details for a test account that does not have owner permissions.
    5. Click OK. The new Access Denied application page should now appear:
    6. Verify that the browser and page titles are as configured, and that the new page icon is also the one configured.
    7. Leaving this page as it is, for the moment.  Do not close this browser page or navigate away from it.
    8. From a new browser tab or browser instance, connect to Central Administration.
    9. In Central Administration, go: System Settings > Farm Management > Manage Farm Solutions.
    10. Click on the your solution listed.  The Solution Properties page is displayed.
    11. Click Retract Solution.  The Retract Solution page is displayed.
    12. Leave all settings default, and then click OK.  You are navigated back to the Solution Management page. Refresh the page, to observe the status of the retraction process.
    13. After a minute of two, the status will be updated to indicate that the retraction process has been completed.
    14. Go back to the browser page still displaying the new access denied application page.
    15. Press the CTRL key, while also pressing F5.  The page will be refreshed, and the default access denied page should then appear.
    16. This completes this posting.
    Summary

    This posting has presented the necessary steps for customizing the SharePoint Server 2010 customizable application pages using Visual Studio 2010.  The approach used in this posting was to deploy the customization as a feature to the SharePoint instance.  All references used in developing this posting are listed below.  You can also implement custom application pages through PowerShell methods, which are discussed in the references cited below.

    References

    SharePoint: Error occurred in deployment step Add Solution

    $
    0
    0
    Problem

    You attempt to deploy a new Visual Studio 2010 solution to SharePoint 2010.  After you click Deploy, you see the following error appear in the Error list:
    Error 3 Error occurred in deployment step 'Add Solution': The solution does not have a WSP file associated with it [your feature or solution name]
    You attempt to deploy the solution again, but again experience the same error.  There appears to be no issue with your solution.

    Solution

    Perform an IISRESET /noforce

    References
     

    How to migrate a VHD to VMware Workstation

    $
    0
    0
    Introduction

    This posting walks you through the process of migrating a pre-configured Microsoft Virtual Hard Disk (VHD) system to VMware, using nothing more complex than a text editor.  This posting integrates relevant postings on this topic from other authors.  Links to all references uses in researching and developing this posting are provided in the References section, below.  This posting was developed on VMware Workstation 7.1.3 build-324285, but applies to other VMware products, including ESX and Player.

    In this posting, you will migrate the Microsoft Windows Server 2003 R2 Enterprise Edition VHD to VMware Workstation 7.1.3.

    Step 1: Prepare VHD
    1. Download or locate the Source VHD. For this posting, the source VHD filename is Win2k3R2EE.vhd.
    2. Create a new folder in your VMware VM directory.  For this posting, a new folder win2k301 was created.
    3. Copy the source VHD to your VMware directory
      While not absolutely necessary, it facilitates file management to keep the VHD source file co-located in the same folder as the target VMware VM folder.
    Step 2: Create New VM
    1. Launch VMware Workstation.
    2. From the File menu, point to New and then point to Virtual Machine..
    3. Click Virtual Machine.  The first page of the New Virtual Machine Wizard appears.
    4. Select the Custom (advanced) option
    5. Click Next.
    6. On the Choose the Virtual machine Hardware Compatibility page, select the appropriate virtual machine hardware compatibility from the Hardware dropdown, and then click Next.
    7. On the Guest Operating System Installation page, select the I will install the operating system later option, and then click Next.
    8. On the Select a Guest Operating System page, from the Guest operating system group, select Microsoft Windows, and then click Next.
    9. On the Processor Configuration page, leave all settings default, and then click Next.
    10. On the memory for the Virtual Machine page, change the memory to 1 GB (1024 MD), and then click Next.
    11. On the Network Type page, choose the network configuration desired.  For this posting, the Use bridged networking option was selected
    12. Click Next.
    13. On the Select I/O Controller Types page, leave the default (LSI Logic), and then click Next.  The next page is the most important in the VM creation process.
    14. On the Select a Disk page, select Use an existing virtual disk.
    15. Click Next.  The Select an Existing Disk page appears
    16. On the Select an Existing Disk page, click Browse, and then navigate to the location of the VHD
    17. Select the VHD file, and then click Open.  The navigation dialog closes, and you are returned to the Select an Existing Disk page
    18. Back on the Select an Existing Disk page, verify that the path and file name are correct, and then click Next.
    19. On the Ready to Create Virtual Machine page, click Finish.  The VM is created and a new tab appears in VMware
    20. Verify that the VM folder now has VMSD, VMX and VMXF files
    Step 3: Edit VMX File
    1. Exit VMware Workstation.  If you are using ESX, remove the new VM (but don't delete the files).
    2. Navigate to the VM folder created in Step 1.  This folder should contain the VHD file along with a VMSD, VMX and VMXF files
    3. Right-click the VMX file, in this posting named win2k301.vmx, point to Open With, and then choose Notepad.  The VMware VM settings file opens in NotePad.
    4. Edit the scsi0.present setting from TRUE to FALSE.
    5. Edit the scsi0:0.present setting from TRUE to FALSE.
    6. Add the following settings:

      ide1:1.present = "TRUE"
      ide1:1.deviceType = "disk"
      ide1:1.fileName = "Win2k3R2EE.vhd"

    7. Save and close the VMX file.
    Step 4: Launch the VM
    1. Launch VMware Workstation.  If you are using ESX, add the VM back.
    2. Start the VM.
    3. If you repeatedly experience this blue screen,
      you may not have correctly edited the VMX settings file.  Review this file and try again.
    4. You'll see the usual Windows settings screen appear
      and then various Windows Setup dialogs will also appear; and the rest is normal Windows startup
    5. If, after logging into the Windows VM, you find the cursor missing or stuck in the bottom right corner, see Troubleshooting I below.
    6. If after trying to shutdown Windows VM, you find that it appears to hang, see Troubleshooting II below.
    Summary

    This posting has presented one method for migrating Microsoft VHD systems to VMware Workstation without the need for third party conversion tools.  The process merely involves minor changes to the VMware settings file for the VM.

    Troubleshooting I: Mouse cursor does not appear within the virtual machine window
     
    This can occur if the original VHD system had Microsoft Virtual Machine Additions installed.  To verify this, perform the following tests:
    1. Right-click anywhere in the virtual machine window: does a pop-up appear repeatedly in the bottom right corner no matter where you right-click?
    2. Using your keyboard navigation skills, check the installed software: is Virtual MachineAdditions listed?
    If either is the case, try the following:
    1. Re-open the VHD in Virtual PC or Hyper-V, remove the Virtual Machine Additions, and then repeat steps 1-4 above.
    2. Re-install or update the VMware tools, but leave out the mouse driver, and then reboot.
    3. Launch Regedit, navigate to

      HKEY_LOCAL_MACHINE\SYSTEM\CurrentControlSet\Control\...
      ...Class\{4D36E96F-E325-11CE-BFC1-08002BE10318}

      look for the UpperFilters setting, and remove msvmmouf and any spaces from its value, leaving the mouclass value still there
    Troubleshooting II: Shutdown Locks
     
    This occurs after attempting a normal shutdown of the server.  The screen changes, the message appears indicating that server is shutting down, the message disappears, and then only a normal desktop is displayed that is unresponsive to keyboard and mouse input.  The only way to force the server to shutdown us using VMware shutdown option.  There is significant discussion and troubleshooting steps on this issue to be found in the VMware knowledgebase.  However, the workaround is simple:
    1. On the VM server (guest OS), from the Start menu, point to Control Panel, and then point to VMware Tools.
    2. Click this item.  The VMware Tools dialog appears
    3. Select the Scripts tab:
      1. On the Scripts tab, from the Script Event dropdown, select Shut Down Guest Operating System.
      2. Enable Use Script.
      3. Select Custom script
      4. Click the Edit button.
      5. In that file, add the following:  shutdown /s /t 10 /d P:0:0 /c "VM guest shutdown".
    4. Save and close the file
    5. Click OK.
    6. Test by performing a normal shutdown of the server.
    References
    Notes

    Health Analyzer: The server farm account should not be used for other services

    $
    0
    0
    Problem

    You connect to Central Administration and observe a critical issue:
    You click the link, View these issues, displayed in the message bar, and you see the error, The server farm account should not be used for other services, appear in the SharePoint 2010 Health Analyzer Review problems and solutions report:
    Solution
    1. Click the error link to view its description dialog:
    2. The error description dialog identifies the cause of the problem: the Web Analytics Data Processing Service is being run by the farm account.
    3. Close the dialog.
    4. In Central Administration, go: Security > General Security > Configure service accounts.  The Service Accounts page appears.
    5. From the dropdown, select Windows Service - Web Analytics Data Processing Service.
      .
    6. From the Select an account for this component dropdown, select a managed account other than the farm account.  For this posting, the sp_app account was selected:
    7. Navigate back to the Review problems and solutions page, and then click the error link, The server farm accounts should not be used for other services.
    8. On the error description dialog, look for the button Reanalyze Now:
      This launches the Health Analyzer
    9. Click this button.  After you click this button, it will become disabled.
    10. Click Close.  The error description dialog closes. Wait a minute or two for the Health Analyzer job to complete.
    11. Refresh the page: the error no longer appears:
    Summary

    This posting presented steps for resolving the health analyzer rule, The server farm account should not be used for other services. For additional details on this topic, consult the references below.

    References
    Notes
    • By default, the rule governing the Health Analyzer checking this condition runs weekly.  You can verify this yourself by going: Monitoring > Health Analyzer > Review rule definitions. Look in the Category: Security group.

    Health Analyzer: Accounts used by application pools or service identities are in the local machine Administrators group

    $
    0
    0
    Problem

    You see the following warning appear in the Review problems and solutions list in SharePoint 2010 Central Administration:
    Accounts used by application pools or service identities are in the local machine Administrators group
    Solution
    1. Click on the warning title.  The warning description dialog appears:
    2. The error description dialog identifies the cause of the problem: the farm administration and timer service accounts are members of the local machine Administrators group. 
      During initial deployment, the farm account is provisioned as a domain user account with local machine administrator privileges.  The farm account only needs local administrator privileges during SharePoint farm provisioning.  Once farm provisioning is completed, this account can be removed from the local administrators group.  You will need to add this back to the local Administrators group during subsequent provisioning tasks, such as User Profile Provisioning.
    3. In Central Administration, go: Security > General Security > Configure service accounts.
    4. From the service dropdown (upper one), select Farm Account.  This refers to the Central Administration service.  The page is updated to show the service components and the account running the service.
    5. Verify that the farm account (in this case, Contoso\sp_farm) is running the Central Administration service:
    6. Login to the machine hosting your SharePoint 2010 farm Central Administration.
    7. Go: Start > Administrative Tools > Services.
    8. Scroll down to the SharePoint 2010 Timer service.
    9. Double-click this service, and then select the Log On tab.
    10. Verify that the farm account is entered:
    11. On the local machine, go: Start > Administrative Tools > Computer Management
    12. In the tree console at left, expand Local Users and Groups, and then select Groups.  The results panel in the middle updates to list local machine groups.
    13. Double-click the Administrators group.  This is the local machine administrators group.
    14. Verify that the farm account appears:
    15. In the Members pane, select the farm account, and then click Remove.  The account no longer appears.
    16. Click OK, and then logout of the local machine hosting Central Administration.
    17. In Central Administration, in the message bar, click View these issues.
    18. On the Review problems and solutions page, click the warning message link, Accounts used by application pools or service identities are in the local machine Administrators group.  The warning description dialog appears:
    19. Click the Reanalyze Now button, and then click Close.
    20. Wait a minute of two, and then refresh the page.  The warning message no longer appears:
    21. This concludes this procedure.
    Troubleshooting

    If, after performing the steps above, the warning message remains, try the following:
    1. Re-run Rule Definition:
      1. In Central Administration, go: Monitoring > Health Analyzer > Review rule definitions.
      2. On the Health Analyzer Rule Definitions page, in the Category: Security group, click the rule definition link, Accounts used by application pools or service identities are in the local machine Administrators group.
      3. Click the Run Now button, then click Close.
      4. Wait a minute or two, and then return to Review problems and solutions page.
      5. Verify that the warning no longer appears.
    2. Reset Farm Service
      1. Login to the local machine hosting the farm Central Administration application.
      2. Go: Start > Administrative Tools > Services.
      3. Scroll down to the SharePoint 2010 Administration service.
      4. Double-click this service.  The services properties dialog appears.
      5. Select the Log On tab.
      6. If not selected, select  the This account option.
      7. Enter or re-enter the farm account.  For this posting, the farm account is Contoso\sp_farm
      8. At the warning prompt, "The new login name will not take effect until you stop and restart the service," click OK.
      9. Stop and restart the service, and then click OK.
      10. Wait a minute or two, and then return to Review problems and solutions page.
      11. Verify that the warning no longer appears.
    3. Reset the Farm Timer Service
      1. Login to the local machine hosting the farm Central Administration application.
      2. Go: Start > Administrative Tools > Services.
      3. Scroll down to the SharePoint 2010 Timer service.
      4. Double-click this service.  The services properties dialog appears.
      5. Select the Log On tab.
      6. If not selected, select  the This account option.
      7. Enter or re-enter the farm account. For this posting, the farm account is Contoso\sp_farm:
      8. At the warning prompt, "The new login name will not take effect until you stop and restart the service," click OK.
      9. Stop and restart the service, and then click OK.
      10. Wait a minute or two, and then return to Review problems and solutions page.
      11. Verify that the warning no longer appears.
    Summary

    This posting presented steps for resolving the Health Analyzer warning, Accounts used by application pools or service identities are in the local machine Administrators group.  It has also presented troubleshooting steps for resolving this warning, if the usual approach appears to fail.  For additional detail on this topic, see the references below.

    References
    Notes
    • If you have not previously modified the services directly, through the Windows Services control applet, you will likely see the account entered as "[domain]\[account name]."  This is how it looks after a fresh install.  Once you edit the account, it will change to "[account name]@[domain]."  This is one way to tell if you need to restart the service.

    Health Analyzer: Built-in accounts are used as application pool or service identities

    $
    0
    0
    Problem

    You see the following warning appear in the Review problems and solutions list in SharePoint 2010 Central Administration:
    Built-in accounts are used as application pool or service identities
    Solution
    1. Click on the warning title.  The warning description dialog appears:
    2. The error description dialog identifies the cause of the problem: the DCLoadBalancer14, SPSearch4 and DCLauncher14 services are being run by a built-in account of the machine hosting the services.
      In this case, all of the services are running on a single application server, part of a small two-tier farm.  In multi-server farms where services may be running on other machines, you will need to perform this check on each server.
    3. In Central Administration, go: Security > General Security > Configure service accounts.
    4. From the service dropdown (upper one), select Windows Service - Document Conversions Load Balancer Service.  This is what is referred to in the warning as "DCLoadBalancer14(Windows Service). The page is updated to show the service components and the account running the service:
    5. From the Select an Account for this component dropdown, select a managed account.  For this posting, the Contoso\sp_app account was used.
    6. Click OK.
    7. Navigate back to the Review problems and solutions page in Central Administration.
    8. Click on the warning title, Built-in accounts are used as application pool or service identities:
    9. Click Reanalyze Now.
    10. Wait a minute or two, and then click on the warning title again.
    11. Verify that DCLoadBalancer14(Windows Service) is no longer included in the warning:
    12. Repeat the above steps, this time choosing Windows Service - Document Conversions Launcher Service.  This is what is referred to in the warning as "DCLauncher14(Windows Service)."
    13. Verify that DCLauncher14(Windows Service) is no longer included in the warning:
    14. Repeat the above steps, this time choosing Windows Service - SharePoint Foundation Search.  This is what is referred to in the warning as "SPSearch4(Windows Service)."
    15. Verify that the warning, Built-in accounts are used as application pool or service identities, is no longer listed:
    16. This concludes this procedure.
    Summary

    This posting presented steps for resolving the Health Analyzer warning, Built-in accounts are used as application pool or service identities.  For additional detail on this topic, see the references below.

    References

    Build a Custom Search Results Page with Facets in SharePoint 2010

    $
    0
    0
    Introduction

    This article shows you how to create a custom site collection search results page, with search facets, in five easy steps.  You will be shown how to do this using nothing more than the standard web front end tools (page edit mode) and the out-of-the-box web parts that come with SharePoint Server 2010.  Site Collection Administrator privileges will be needed to actually point site collection search to the new search results page, but the rest can be done with no more than standard Contributor permissions.  Creating a custom search results page is remarkably easy, and this article shows you how.

    There are a few assumptions to keep in mind, as you work through this article.  The first is that the SharePoint Server Publishing Infrastructure feature has been activated for the target site collection. Second, it assumes that you have added content to your site collection, such as Office documents.  Third, it assumes that  Search has been successfully configured and that content has been indexed.  Lastly, it assumes that a Search center has not been configured and that site collection search results are still being presented in the default search results page.  One more thing: in developing this article, I performed the testing against a special corpus of content that I created that has been seeded with keywords designed to return known results.

    Step 1: Add a new page
    1. Navigate to the top site of the site collection.
    2. From the Site Actions dropdown, select More Options.
    3. Select Page, from the Filter By group, at left, and then select Web Part Page.
    4. Click Create.
    5. Enter a name for the new page.  For this article, MyCustomSearchResults was used.
    6. Select the Layout Template.  For this article, the Header, Left Column, Body template was used.
    7. Then select the document library where you want to page to be stored.  For this article, the Site Pages library was used.  You could also use the Site Collection Documents library.
    8. Click Create.  The new web part page is created, and your browser is navigated to the page in edit mode.
    9. On the Page ribbon, click the Stop Editing button.  The page is refreshed, and now appears in normal mode.
    Step 2: Add basic search results capability
    1. In the Body web part zone, click Add a Web Part.  A new section appears on the web page, from which you can select web parts.
    2. In the Categories section, scroll down and select Search; then, in the Web Parts section, use the arrow links to browse the search web parts for Search Core Results, and then select this web part.
    3. Click the Add button.  The page is refreshed to show the new web part in the Body web part zone.
    4. On the Page ribbon, click the Stop Editing button.  The page is refreshed, and now appears in normal mode.
    Step 3: Configure the Site Collection Search to use the custom page
    1. From the Site Actions dropdown, select Site Settings.
    2. In the Site Collection Administration group, click Search Settings.  The browser is navigated to the Search Settings page.
    3. In the Site Collection Search Results Page field, enter the path and filename to your new custom search results page.  For this article, the path and filename would be: /SitePages/MyCustomSearchresults.aspx. Leave all other settings at their default values.
    4. Click OK.  Now to test the results against the test content.
    5. The first test will use the keyword document010, which should return just three results: one each of Word, PowerPoint and Excel documents.
      Performing the search returns the expected results. 
      So far so good.
    6. The second test will use the keyword Global010, which should return 30 results: 10 each of Word, PowerPoint and Excel documents.  Performing the search does not return the expected results.
    7.  
    Step 4: Add Paging Capability
    1. With your browser still connected to the new custom search results page, on the ribbon, select the Page tab, and then click the Edit Page button.  The page is refreshed to display it in edit mode.
    2. In the Body web part zone, click Add a Web Part.  A new section appears on the web page, from which you can select web parts.
    3. In the Categories section, scroll down and select Search; then, in the Web Parts section, use the arrow links to browse the search web parts for Search Paging, and then select this web part.
    4. Click the Add button.  The page is refreshed to show the new web part in the Body web part zone.
    5. Optional: by default, the new web part appears above the existing one.  However, you can easily move it below, by simple drag-and-dropping methods.  For this article, the SearchPaging web part is moved to below the Search Core Results web part.
    6. On the Page ribbon, click the Stop Editing button.  The page is refreshed, and now appears in normal mode.  Now to test the results against the test content.
    7. The test will again use the keyword Global010, which should return 30 results: 10 each of Word, PowerPoint and Excel documents.  Performing the search returns a list of 10 results, and paging tools now appear.
    8. The next step is to implement search facets.
    Step 5: Add search facets
    1. With your browser still connected to the new custom search results page, on the ribbon, select the Page tab, and then click the Edit Page button.  The page is refreshed to display it in edit mode.
    2. In the Left Column web part zone, click Add a Web Part.  A new section appears on the web page, from which you can select web parts.
    3. In the Categories section, scroll down and select Search; then, in the Web Parts section, use the arrow links to browse the search web parts for Refinement Panel, and then select this web part.
    4. Click the Add button.  The page is refreshed to show the new web part in the Left Column web part zone.
    5. While were at it, let's add one more useful search web part: the Search Statistics web part, which displays the number of results returned and how many you are currently viewing (given search paging).  Add the web part using the same method as previously. 
      After you finish, you'll see two web parts displayed at left.
    6. On the Page ribbon, click the Stop Editing button.  The page is refreshed, and now appears in normal mode.  Now to test.
    7. The test will again use the keyword Global010, which should return 30 results: 10 each of Word, PowerPoint and Excel documents.  Performing the search returns a list of 10 results, as expected. 
      The search facets display the default facets.  Note that the Search Statistics web part discretely displays the number of currently viewed search results. 
    Summary

    This article has shown you how to implement a custom site collection search results page in just five easy steps, and all without writing any code, nor even using SharePoint Designer for that matter.  For additional details on the topics discussed in this article, consult the references below.

    References

    Word Web App cannot open this document for viewing because of an unexpected error

    $
    0
    0
    Problem

    Users experience the following error whilst attempting to view in their web browsers Microsoft Word documents located in SharePoint 2010 document libraries:
    Word Web App cannot open this document for viewing because of an unexpected error...

    They may also encounter a similar error whilst attempting to view Microsoft PowerPoint documents also located in SharePoint 2010 document libraries:
    PowerPoint Web App cannot open this presentation for viewing because of an unexpected error…

    TechNet provides a thorough OWA troubleshooting guide for engaging this problem on the server side, and the methods presented in that guide will not be elaborated here.  However, this guide does not discuss client-side issues that can also generate this problem.  These will be presented in this posting.

    Discussion

    If your users present this error to you then certainly review the troubleshooting methods presented in the TechNet article.  However, it may be useful to also consider the version of Microsoft Office that your users are using and whether their installed Microsoft Office is correctly configured.

    Office Web Apps supports browser-based viewing of Microsoft Office 2010 applications.  It does not support browser-based viewing of earlier versions Microsoft Office.  It's not just that your users must have Microsoft Office 2010 installed, but that the version of the Office file that they are viewing must be fully Office 2010 compliant.  For example, Microsoft Office 2007 files can be viewed from within Microsoft Office 2010, but that does not mean that this file supports browser-based viewing.  This can be confusing to users who may not immediately know the difference.  There are also more subtle issues to contend with.

    If Microsoft Office 2007 was originally deployed to your users, and your organization subsequently upgraded this in-place to Microsoft office 2010, then features of the 2007 version may still exist among the deployed software base.  For example, the Normal.dot template of Microsoft Office Word 2007 may not be upgraded to 2010 but remain among user installations.  To determine this, have the user launch their Microsoft Word 2010 application, and then note the default document version that is opened.  Is it Word 2003-2007 or simply Word?  Also check the Word title bar, after Word is launched: does it include [Compatibility Mode] in the title?  Or, enter some text into the blank document, and then configure it as Header 1.  Next, change the theme.  Does the header color change or remain the same color?  These are indications that the Normal.Dot template is the Word 2007 version and not the 2010 version.  If your deployed Office base is still using the Word 2007 Normal.dot template, your users will create documents that they think are 2010, upload these to your SharePoint 2010 farm, and then naturally expect to be able to view them through their browsers.  They become understandably confused when they haven't and they can't.

    Resolution of these problems is not technically difficult, but it will be time-consuming.  There are both systems admin and user aspects to the resolution.

    Solutions
    • SharePoint Administrators
      • Work through the detailed steps in the TechNet article  Office Web Apps troubleshooting
      • Engage in user training
    • Systems Administrators
      • Check the deployed Office 2010 user base default templates:
        • Word: Normal.dotm, Normal.dotx
        • Excel: Book.xlt, Book.xltx, Book.xltm and Sheet.xlt, Sheet.xltx, Sheet.xltm
        • PowerPoint: Blank.pot, Blank.potx
      • Windows 7 default office template location:
        • %Appdata%\Microsoft\Templates\
    • Users
      • Check the application title bar for "[Compatibility Mode]".
      • Go: File > Info, and then click Convert.
      • Save the document as Word Document (.docx) before uploading to a document library.
    At any time, users can convert their documents fully to Office 2010 format by intentionally saving them as simply Word, or Excel or PowerPoint documents and not 97 - 2003 Compatible.

    Summary

    This article presented client-side configuration aspects to Office Web Apps troubleshooting.  These client-side configuration aspects can present the same error messages as those presented by server-side configuration aspects.

    References

    SharePoint 2010: The operation that you are attempting to perform cannot be completed succesfully

    $
    0
    0
    Problem

    Your web application has a single content database.  You have previously created a granular backup of a site collection in the web application.  You attempt to perform a site collection restore,
    Restore-SPSite [site collection URL] -Path [filename] -Force
    but then experience the following error:
    Restore-SPSite : The operation that you are attempting to perform cannot be completed succesfully.  No content databases in the web application were available to store your site collection.  The existing content databases may have readhed the maximum number of site collections, or be set to read-only, or be offline, or may already contain a copy of this site collection.  Create another content database for the Web application and then try the operation again...
    Solution

    This can be related to an orphaned site in the database or a database upgrade needed.  But before engaging more complex testing, be sure to check the content database properties:
    • Database status: should be set to Ready.
    • Number of sites  before a warning is generated: should be set to 2 or greater.
    • Maximum number of sites that can be created in this database: set to 3 or greater.
    References
     

    Error 10016: The machine-default permission settings do not grant Local Activation permission for the COM Server application with CLSID {000C101C-0000-0000-C000-000000000046}

    $
    0
    0
    Problem

    The following error appears in a SharePoint Server 2010 farm server system log:

    Log Name: System
    Source: Microsoft-Windows-DistributedCOM
    Date: [date]
    Event ID: 10016
    Task Category: None
    Level: Error
    Keywords: Classic
    User: [domain]\[FarmAccount]
    Computer: [FarmServerName]
    Description:
    The machine-default permission settings do not grant Local Activation permission for the COM Server application with CLSID {000C101C-0000-0000-C000-000000000046}
    and APPID
    {000C101C-0000-0000-C000-000000000046}
    to the user [domain]\[FarmAccount] SID... from address LocalHost (Using LRPC). This security permission can be modified using the Component Services administrative tool.
    Discussion
    This error is being logged to the System event log due to the farm account not having permission to access the DCOM component at 000C101C-0000-0000-C000-000000000046.

    Solution
    1. Grant Farm Account Permissions to Component
      1. Open the Component Services tool on the server.
      2. Look for the DCOM component 000C101C-0000-0000-C000-000000000046.
      3. Right-click this component and select Properties.
      4. Select the Security tab.
      5. If all options are disabled, complete the steps in section Change Component Owner, and then return; and then close and launch Component Services. 
        If after changing the key ownership, you find that these options are still disabled, close Component Services and then re-open it.
         
      6. In the Launch and Activation Permissions section, select Customize.
      7. Click the Edit button.
      8. Add the farm account. 
        When initially added, the account will only have (Allow) Local Launch checked.
         
      9. Check (Allow) Local Activation.
      10. Click OK.
      11. Click Apply, and then click OK.
      12. Reset IIS.
      13. Stop and then start SharePoint 2010 Timer.
    2. Change Component Owner
      1. Start Registry Editor in Administrator mode on the server.
      2. Find key HKEY_LOCAL_MACHINE\SOFTWARE\Classes\AppID\{000C101C-0000-0000-C000-000000000046} .
      3. Right-click this key, and then select Permissions. The Permissions dialog appears.
        You may see your administrator group here and think that you can set Full Control for your group. However, if you try this, you will get an Access is denied error prompt
         
      4. Click the Advanced button.  The Advanced Security Settings dialog appears.
      5. Select the Owner tab. 
        By default, the Current Owner will be the TrustedInstaller account.
         
      6. Select your administrator account or group, and check Replace owner on subcontainers and objects, and then click Apply.
      7. Click OK.  The Advanced Security Settings dialog closes, and the focus returns to the Permissions dialog.
      8. Select your administrator account of group, and then check Full Control.
      9. Click OK.  The Permissions dialog closes.
      10. Exit Registry Editor.
    References
      Viewing all 388 articles
      Browse latest View live


      <script src="https://jsc.adskeeper.com/r/s/rssing.com.1596347.js" async> </script>